Experiments with Orange Pi 6 Plus (CIX P1 SBC) and MIPI-CSI camera (ov13855).
| Soc | Board | Distro | Memory size | Kernel version | Camera | sensor | Max. window size | fps |
|---|---|---|---|---|---|---|---|---|
| CIX P1 | Orange Pi 6 Plus | Debian 12 | 32 GB | 6.1.44-cix | camera1 | ov13855 | 1920x1080 | 30 fps |
| CIX P1 | Orange Pi 6 Plus | Debian 12 | 32 GB | 6.1.44-cix | camera2 | ov13855 | 1920x1080 | 30 fps |
| CIX P1 | Orange Pi 6 Plus | Debian 12 | 32 GB | 6.1.44-cix | camera3 | webcam 720p | 640x480 | 30 fps |
| CIX P1 | Orange Pi 6 Plus | Debian 12 | 32 GB | 6.1.44-cix | camera4 | webcam | 640x480 | 30 fps |
| CIX P1 | Orange Pi 6 Plus | Debian 12 | 32 GB | 6.1.44-cix | camera5 | usb H264 | 1920x1080 | 30 fps |
| CIX P1 | Orange Pi 6 Plus | Debian 12 | 32 GB | 6.1.44-cix | camera6 | usb H265 | 2560x1440 | 30 fps |
Table of Contents:
- Introduction
- MIPI Camera OV13855
- Packages for dev
- Gstreamer
- Gstreamer - Display camera content on screen
- GStreamer hardware encoder and decoder
- Record video and display it on the screen
- Real-time streaming
- SDL3
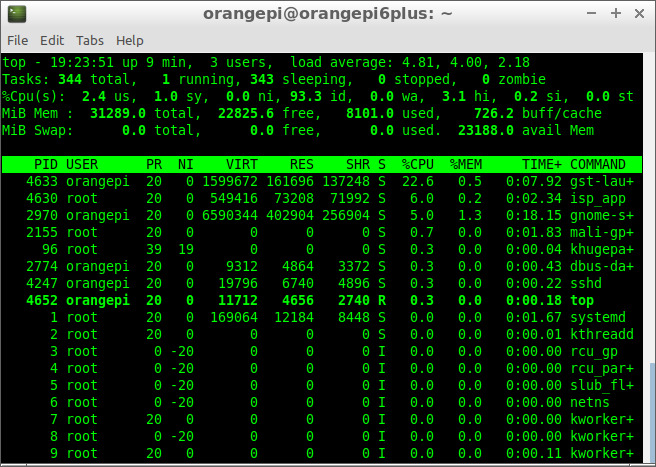
- HTOP
- NPU
- FFmpeg vs GStreamer vs mpv vs testffmpeg
- USB camera H264/H265
- References
- Issues
For the experiments i will use an Orange Pi 6 Plus, 32 GB of ram, and dual camera with ov13855 sensor and Debian 12 with GNOME (wayland).
I'll conduct some experiments with the camera1 and camera2 and the NPU as soon as cix-opencv deb package is available for the Orange Pi 6 Plus (CIX P1 SBC) atfer using upstream OpenCV.
The kernel version for these experiments is kernel 6.1-cix ("stock" version) and, if i'm brave enough i will build and rerun the experiments with kernel 6.6.
The board is considered, at the moment of these experiments a developer version, so not ready for an everyday use if you consider stability a premise.
The reason is the v4l2 commands are not truly v4l2 compliant and any attempt to use it can cause the kernel to crash or require a full reboot.
That being said, gstreamer comes to the rescue, but an incorrect pipeline can also cause a reboot.
I would rather use Weston, which is faster than GNOME, but i could not run a Weston session or switch to any TTY and run Weston from there, if someone was able to do this, please advise.
Contents will be added/changed soon. This is a WiP...
A simple v4l2 command will reboot the board:
v4l2-ctl -d /dev/video1 --all
Driver Info:
	Driver name      : arm-china-isp
	Card type        : linlon isp v4l2
	Bus info         : platform:armcb_isp_v4l2-00
	Driver version   : 6.1.44
	Capabilities     : 0x85201000
		Video Capture Multiplanar
		Read/Write
		Streaming
		Extended Pix Format
		Device Capabilities
	Device Caps      : 0x05201000
		Video Capture Multiplanar
		Read/Write
		Streaming
		Extended Pix Format
Media Driver Info:
	Driver name      : imgsensor0
	Model            : armcb_isp_v4l2
	Serial           :
	Bus info         : platform:armcb_isp_v4l2-000
	Media version    : 6.1.44
	Hardware revision: 0x00000000 (0)
	Driver version   : 6.1.44
Interface Info:
	ID               : 0x03000002
	Type             : V4L Video
Entity Info:
	ID               : 0x00000001 (1)
	Name             : armcb-00-vid-cap
	Function         : V4L2 I/O
Priority: 2
To build some applications, like gstreamer, ffmpeg, sdl3, htop, etc.., some dev packages and dependencies are needed to be installed.
Here is a summary i installed so far:
sudo apt-get install debhelper-compat dh-exec dh-sequence-gnome gnome-pkg-tools gnome-settings-daemon-dev gsettings-desktop-schemas-dev gtk-doc-tools libcanberra-gtk3-dev libcolord-dev libgbm-dev libgnome-desktop-3-dev libgtk-3-dev libgudev-1.0-dev libinput-dev liblcms2-dev libnvidia-egl-wayland-dev libpam0g-dev libpipewire-0.3-dev libstartup-notification0-dev libsystemd-dev libwacom-dev libx11-xcb-dev libxcb-randr0-dev libxcb-res0-dev libxkbcommon-x11-dev libxkbfile-dev python3-dbusmock sysprof xcvt xvfb
and
sudo apt-get install clang glslang-dev flite1-dev frei0r-plugins-dev ladspa-sdk libaom-dev libaribb24-dev libass-dev libbluray-dev libbs2b-dev libbz2-dev libcaca-dev libcdio-paranoia-dev libchromaprint-dev libcodec2-dev libdav1d-dev libffmpeg-nvenc-dev libgme-dev libgnutls28-dev libgsm1-dev libiec61883-dev libavc1394-dev libjack-jackd2-dev libjxl-dev liblilv-dev libmysofa-dev libopenal-dev libomxil-bellagio-dev libopencore-amrnb-dev libopencore-amrwb-dev libopenmpt-dev libopus-dev libplacebo-dev libpocketsphinx-dev librabbitmq-dev librav1e-dev librist-dev librubberband-dev librsvg2-dev libsctp-dev libshine-dev libsmbclient-dev libsnappy-dev libsoxr-dev libspeex-dev libsrt-gnutls-dev libssh-gcrypt-dev libsvtav1enc-dev libtesseract-dev libtheora-dev libtwolame-dev libva-dev libvdpau-dev libvidstab-dev libvo-amrwbenc-dev libvpx-dev libx264-dev libx265-dev libxcb-shape0-dev libxcb-xfixes0-dev libxvidcore-dev libzimg-dev libzmq3-dev libzvbi-dev texinfo nasm pkg-kde-tools cleancss doxygen node-less
sudo apt-get install geany-plugins
sudo apt-get install libmujs2-dev
sudo apt-get install libmujs2
sudo apt-get install libxpresent1
sudo apt-get install liblua5.2-0
sudo apt-get install libxpresent1
sudo apt-get install libmujs2
sudo apt-get install libsixel1
sudo apt install libfreetype-dev fonts-freefont-ttf
sudo apt install libwayland-egl1
sudo apt install valgrind
## SDK
pip3 install PyGObject
pip3 install -r requirements.txt
pip3 install -r torch
pip3 install torch torchvision
Note that NOT all of them are a requirement, and sometimes, the order of install are important to resolv conflits.
Orange Pi 6 Plus has two MIPI-CSI camera interfaces, cam1 and cam2 and can be used at the same time.
The ov13855 sensor is capable of 4224x3136@30fps but for some reason i was able to grab only 1920x1080@30fps, maybe an updated firmware or if the source code is released we can improve things here.
The cameras are attached to cam1 and cam2 connectors near the sd card slot, see the manual for reference. In order to use cam1 and cam2 at the same time you must change the isp service that manage the cameras.
1. Change the line:
ExecStart=/usr/bin/isp_app -s 0 &
to
ExecStart=/usr/bin/isp_app -m 2 &
2. Use mcedit to edit, change the line and Save it with F2 then quit with F10
sudo mcedit /lib/systemd/system/isp-daemon.service
[Unit]
Description=ISP Daemon
After=network.target load-isp-modules.service

[Service]
Type=simple
Environment=LD_LIBRARY_PATH="/usr/share/cix/lib"
ExecStart=/usr/bin/isp_app -m 2 &
Restart=always
RestartSec=1
StartLimitInterval=10
StartLimitBurst=5

[Install]
WantedBy=multi-user.target
3. Reboot the board with:
sudo reboot
Gstreamer is a poweful tool to help grab the frames and display it on screen. It can also utilize the Hardware encoder to record video from the camera(s) or stream videos in real-time across the network. At the other end, you can utilize the Hardware decoder to display the stream in real-time or display the recorded file. Currently only gstreamer can be used.
Available pixel formats for /dev/video1:
  NM12 (32314d4e), Y/UV 4:2:0 (N-C), flags = 0
  RGB3 (33424752), 24-bit RGB 8-8-8, flags = 0
Gstreamer is provided by CIX/RADXA team.
- Pipeline:
gst-launch-1.0 v4l2src device=/dev/video1 ! video/x-raw,format=NV12, width=1920, height=1080 ! videoconvert ! glimagesink
- Pipeline:
gst-launch-1.0 v4l2src device=/dev/video1 ! video/x-raw,format=NV12, width=1920, height=1080 ! videoconvert ! fakesink v4l2src device=/dev/video3 ! video/x-raw,format=NV12, width=1920, height=1080 ! videoconvert ! glimagesink
-
Pipeline:
Type the command in the Terminal and move the first image on the screen to the side or resize the window with your mouse.
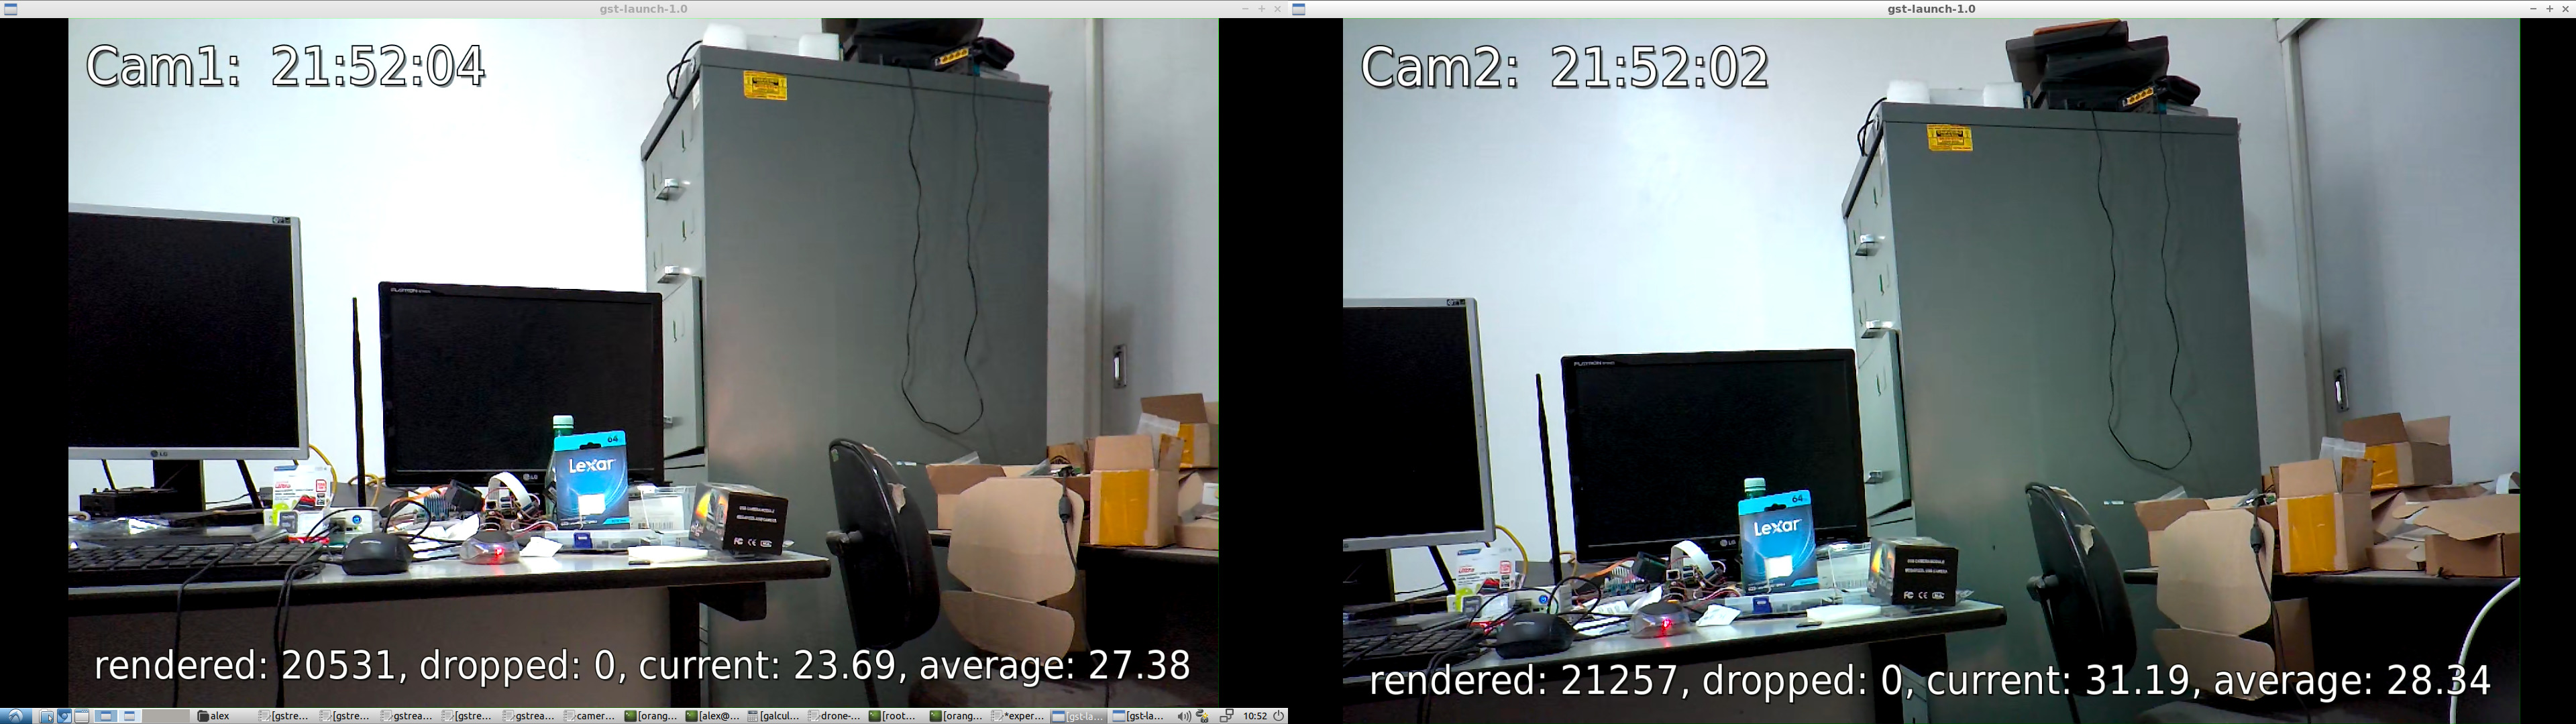
gst-launch-1.0 v4l2src device=/dev/video1 ! video/x-raw,format=NV12, width=1920, height=1080 ! videoconvert ! autovideosink v4l2src device=/dev/video3 ! video/x-raw,format=NV12, width=1920, height=1080 ! videoconvert ! autovideosink
Hardware encoding and decoding are performed by the VPU (Video Processing Unit), which accelerates video encoding and decoding, making video playback more power-efficient and freeing up the CPU for other tasks.
There are several encoders available with Gstreamer, but we will focus on Hardware Encoder: H265 (HEVC).
gst-inspect-1.0 | grep 'video4' | grep 'Encoder'
video4linux2:  v4l2h264enc: V4L2 H.264 Encoder
video4linux2:  v4l2h265enc: V4L2 H.265 Encoder
video4linux2:  v4l2jpegenc: V4L2 JPEG Encoder
video4linux2:  v4l2vp8enc: V4L2 VP8 Encoder
video4linux2:  v4l2vp9enc: V4L2 VP9 Encoder
There are several decoders available with Gstreamer, but we will focus on Hardware Decoder: H265 (HEVC).
gst-inspect-1.0 | grep 'video4' | grep 'Decoder'
video4linux2:  v4l2av1dec: V4L2 AV1 Decoder
video4linux2:  v4l2h263dec: V4L2 H263 Decoder
video4linux2:  v4l2h264dec: V4L2 H264 Decoder
video4linux2:  v4l2h265dec: V4L2 H265 Decoder
video4linux2:  v4l2jpegdec: V4L2 JPEG Decoder
video4linux2:  v4l2mpeg2dec: V4L2 MPEG2 Decoder
video4linux2:  v4l2mpeg4dec: V4L2 MPEG4 Decoder
video4linux2:  v4l2vp8dec: V4L2 VP8 Decoder
video4linux2:  v4l2vp9dec: V4L2 VP9 Decoder
Enable VPU monitoring before running the experiments
echo 3 | sudo tee /sys/kernel/debug/amvx/log/group/perf/enable > /dev/null
For this experiments the Hardware encoder v4l2h265enc will be used.
To record video with H.265 (HEVC) encoder and Matroska (MKV) container, use the following pipelines:
-
Camera1
This pipeline will save the video to the file video_camera1_1920x1080.mkv
gst-launch-1.0 v4l2src device=/dev/video1 ! video/x-raw,format=NV12, width=1920, height=1080 ! videoparse width=1920 height=1080 framerate=30/1 format=nv12 ! video/x-raw,colorimetry=bt709 ! v4l2h265enc capture-io-mode=mmap output-io-mode=dmabuf extra-controls="encode,fixed_qp=28" ! video/x-h265,profile=main,level=\(string\)5 ! h265parse ! matroskamux ! filesink location=video_camera1_1920x1080.mkv -
Camera2
This pipeline will save the video to the file video_camera2_1920x1080.mkv
gst-launch-1.0 v4l2src device=/dev/video3 ! video/x-raw,format=NV12, width=1920, height=1080 ! videoparse width=1920 height=1080 framerate=30/1 format=nv12 ! video/x-raw,colorimetry=bt709 ! v4l2h265enc capture-io-mode=mmap output-io-mode=dmabuf extra-controls="encode,fixed_qp=28" ! video/x-h265,profile=main,level=\(string\)5 ! h265parse ! matroskamux ! filesink location=video_camera2_1920x1080.mkv -
Camera1 and Camera2 at the same time
This pipeline will save the video to the files video_camera1_1920x1080.mkv and video_camera1_1920x1080.mkv at the same time
gst-launch-1.0 v4l2src device=/dev/video1 ! video/x-raw,format=NV12, width=1920, height=1080 ! videoparse width=1920 height=1080 framerate=30/1 format=nv12 ! video/x-raw,colorimetry=bt709 ! v4l2h265enc capture-io-mode=mmap output-io-mode=dmabuf extra-controls="encode,fixed_qp=28" ! video/x-h265,profile=main,level=\(string\)5 ! h265parse ! matroskamux ! filesink location=video_camera1_1920x1080.mkv v4l2src device=/dev/video3 ! video/x-raw,format=NV12, width=1920, height=1080 ! videoparse width=1920 height=1080 framerate=30/1 format=nv12 ! video/x-raw,colorimetry=bt709 ! v4l2h265enc capture-io-mode=mmap output-io-mode=dmabuf extra-controls="encode,fixed_qp=28" ! video/x-h265,profile=main,level=\(string\)5 ! h265parse ! matroskamux ! filesink location=video_camera2_1920x1080.mkv
For this experiments the Hardware decoder v4l2h265dec will be used.
To display the H.265 (HEVC) video recorded above in MKV, the following pipelines can be used:
-
using decodebin for any encoder
gst-launch-1.0 filesrc location=video_camera1_1920x1080.mkv ! decodebin ! glupload ! glcolorconvert ! glcolorbalance ! glimagesink -
using v4l2h265dec for MKV container
gst-launch-1.0 filesrc location=video_camera1_1920x1080.mkv ! matroskademux ! h265parse ! v4l2h265dec ! fpsdisplaysink video-sink=autovideosink text-overlay=true
To record video and display it on screen at the same time, use the following pipeline:
gst-launch-1.0 v4l2src device=/dev/video1 ! video/x-raw,format=NV12, width=1920, height=1080 ! tee name=t t. ! queue ! videoparse width=1920 height=1080 framerate=30/1 format=nv12 ! video/x-raw,colorimetry=bt709 ! v4l2h265enc capture-io-mode=mmap output-io-mode=dmabuf extra-controls="encode,fixed_qp=28" ! video/x-h265,profile=main,level=\(string\)5 ! filesink location=video_camera1_1920x1080.hevc t. ! queue ! videoconvert ! glimagesink
This experiment streams live videos from the Orange Pi 6 Plus to an Intel Box, the encoder used is H.265 (HEVC). It is decoded and displayed on the receiving end (Intel Box).
- Live streaming with TCPIP (client / server)
- Live streaming with RTSP.
- Live streaming with RTMP.
[Client: Orangepi 6 plus] --> [H265 encoder] --> [TCP - localhost] --> [Server: Orangepi 6 plus] --> [H265 decoder] --> [Display it on screen]
Client
gst-launch-1.0 tcpserversrc port=5000 host=0.0.0.0 ! h265parse ! v4l2h265dec ! fpsdisplaysink video-sink=autovideosink text-overlay=true sync=false
Server
gst-launch-1.0 v4l2src device=/dev/video1 ! video/x-raw,format=NV12, width=1920, height=1080 ! videoparse width=1920 height=1080 framerate=30/1 format=nv12 ! video/x-raw,colorimetry=bt709 ! v4l2h265enc capture-io-mode=mmap output-io-mode=dmabuf extra-controls="encode,fixed_qp=28" ! video/x-h265,profile=main,level=\(string\)5 ! tcpclientsink host=localhost port=5000
[Client: Orangepi 6 plus] --> [H265 encoder] --> [TCP - ethernet] --> [Server: Intel Box] --> [H265 decoder] --> [Display it on screen]
Client (Orange Pi 6 Plus)
IP: 192.168.254.75
gst-launch-1.0 v4l2src device=/dev/video1 ! video/x-raw,format=NV12, width=1920, height=1080 ! videoparse width=1920 height=1080 framerate=30/1 format=nv12 ! video/x-raw,colorimetry=bt709 ! v4l2h265enc capture-io-mode=mmap output-io-mode=dmabuf extra-controls="encode,fixed_qp=28" ! video/x-h265,profile=main,level=\(string\)5 ! tcpclientsink host=192.168.254.253 port=5000
Server (Intel Box)
IP: 192.168.254.253
gst-launch-1.0 tcpserversrc port=5000 host=0.0.0.0 ! h265parse ! v4l2h265dec ! fpsdisplaysink video-sink=autovideosink text-overlay=true sync=false
cat /sys/kernel/debug/amvx/log/group/perf/utilization
VPU Utilization: 29.83%
cat /sys/kernel/debug/amvx/log/group/perf/realtime_fps
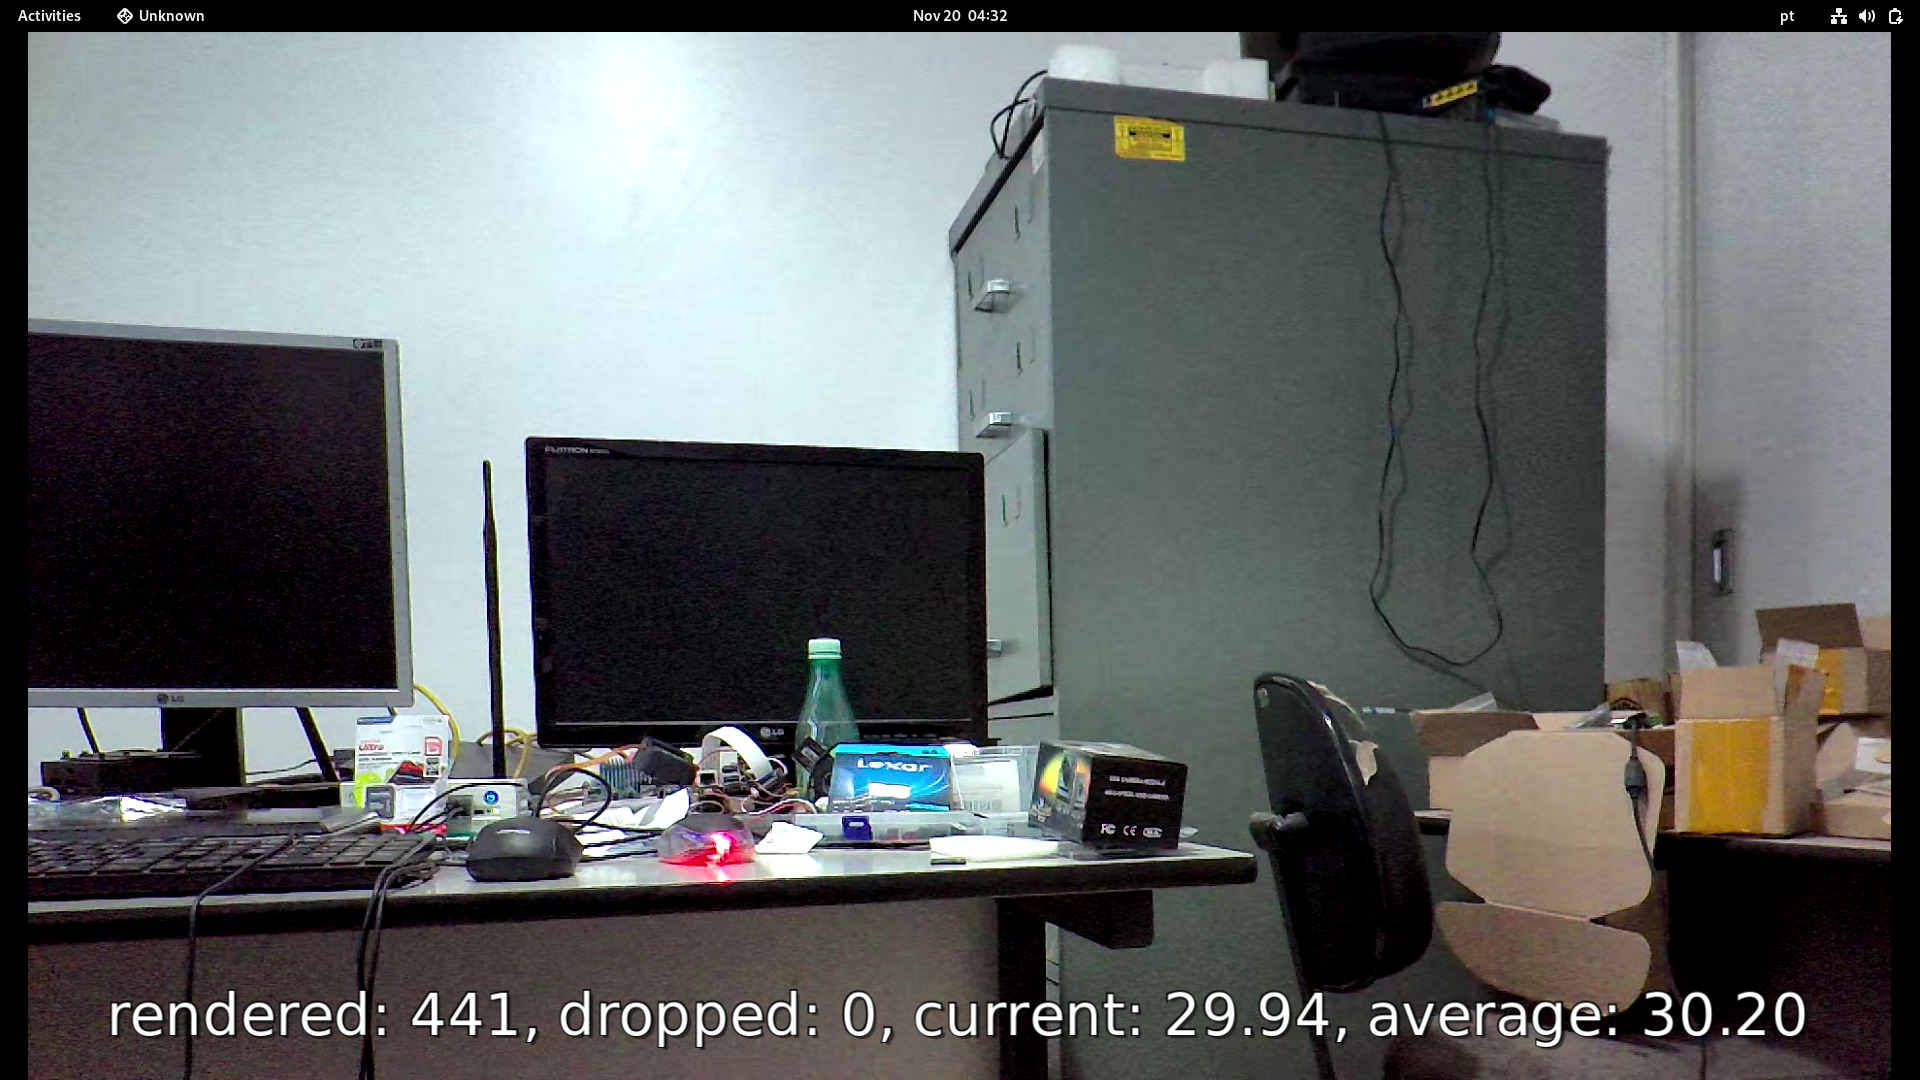
13:39:44 ~ 13:47:16 [ffff0002886d4138] HEVC encoder 1920x1080 12979 frames, current fps 29.92, average fps 28.27
13:39:45 ~ 13:47:16 [ffff0002886c4138] HEVC encoder 1920x1080 12477 frames, current fps 26.16, average fps 27.23
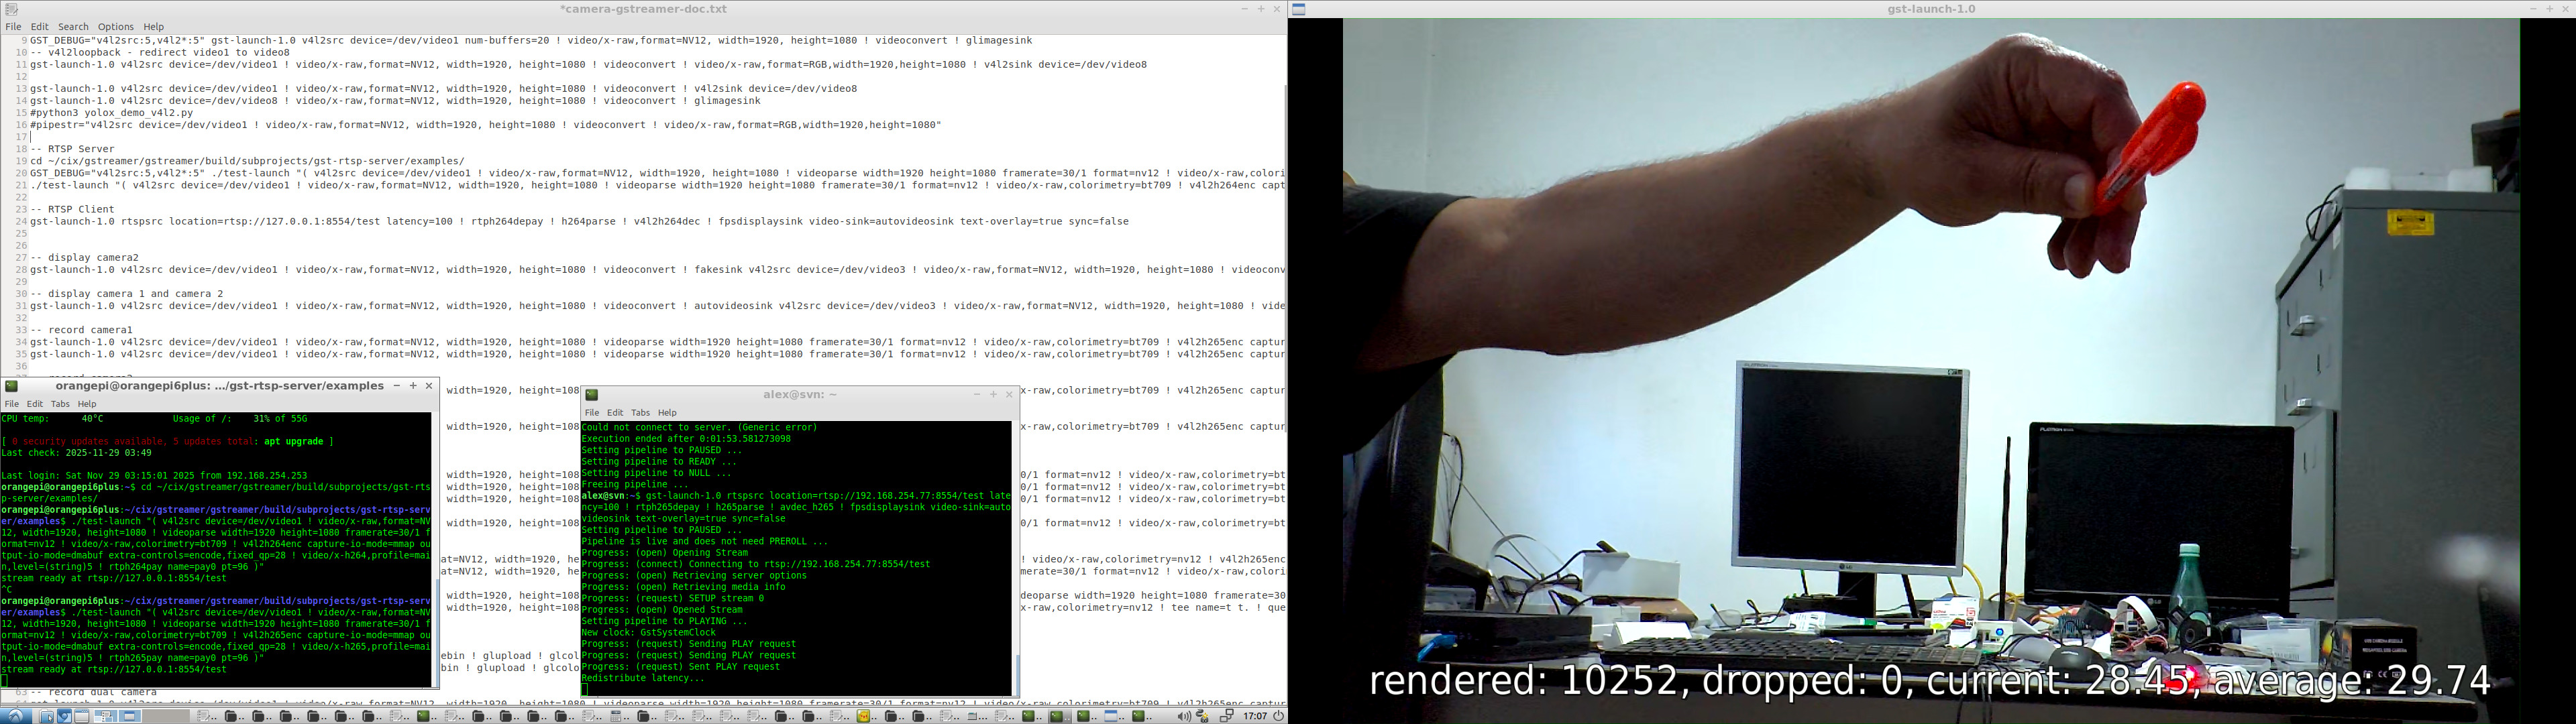
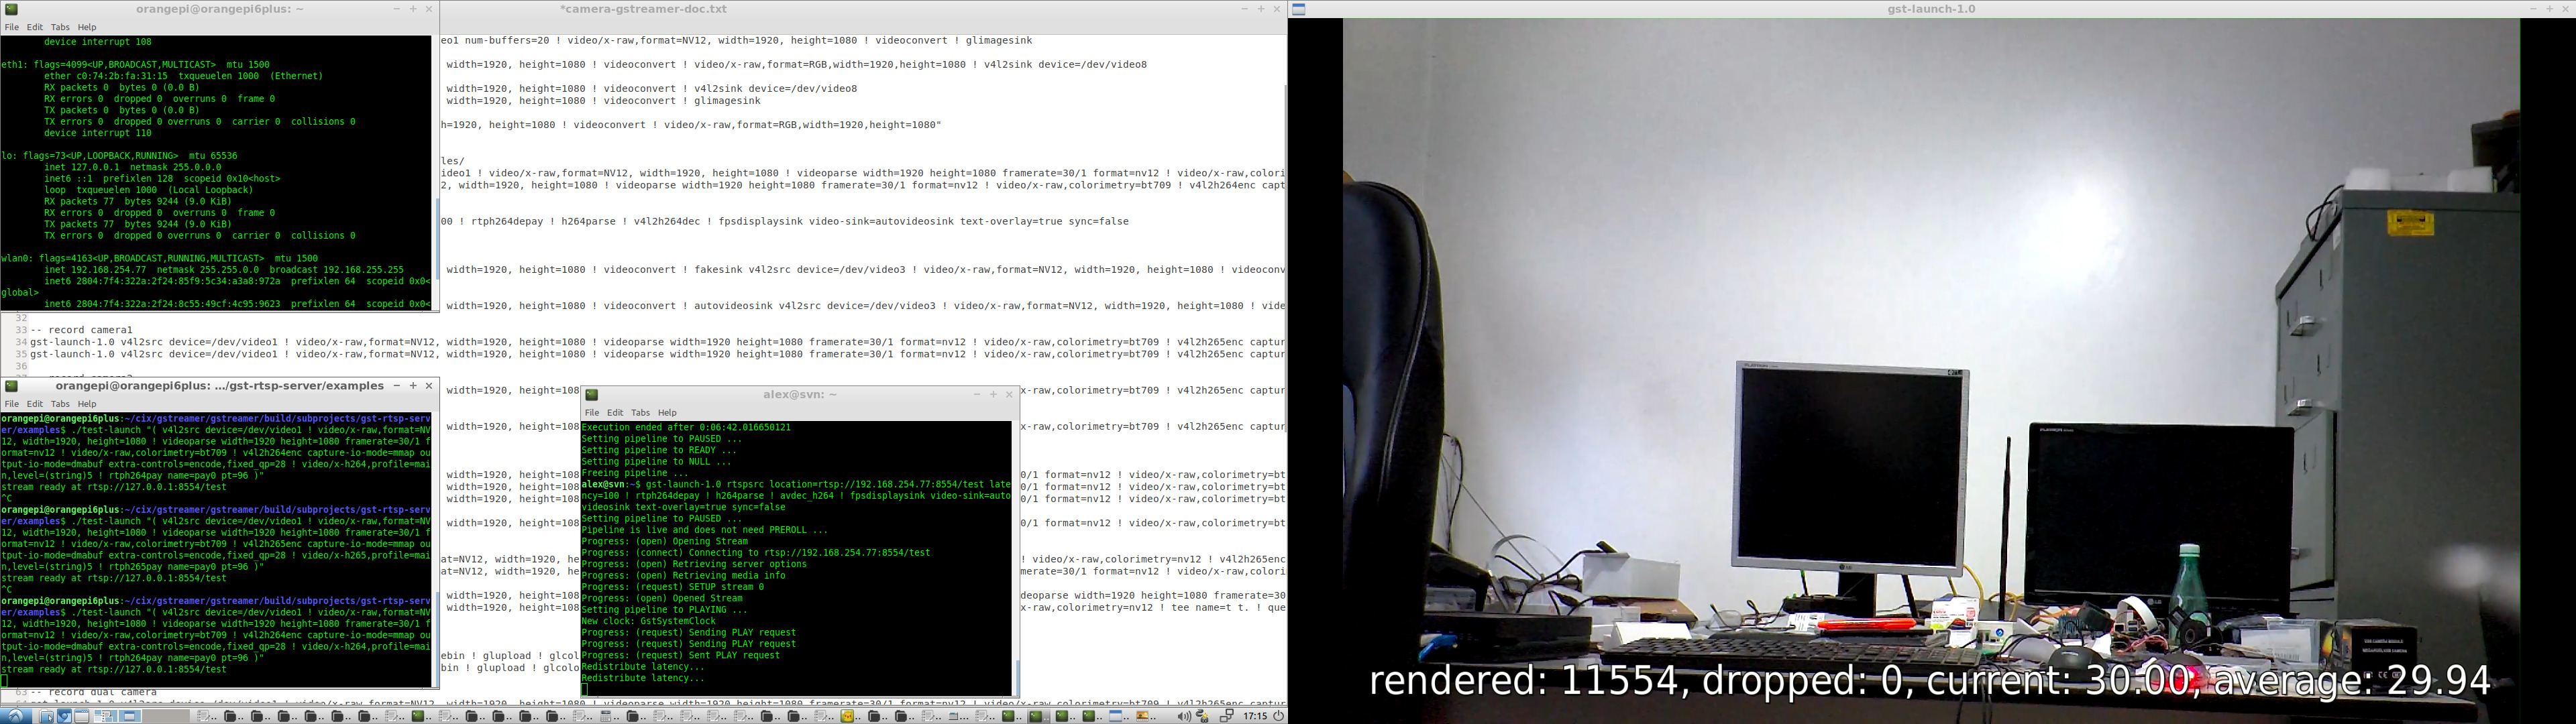
Real-Time Streaming Protocol (RTSP) works fine. In this experiment, i stream video using RTSP from Orange Pi 6 Plus to an Intel Box (x64). You need to build RTSP Server to stream live videos from the Orange Pi.
-
Orange Pi 6 Plus (Server)
IP: 192.168.254.77
-
Intel Box (Client)
IP: 192.168.254.253
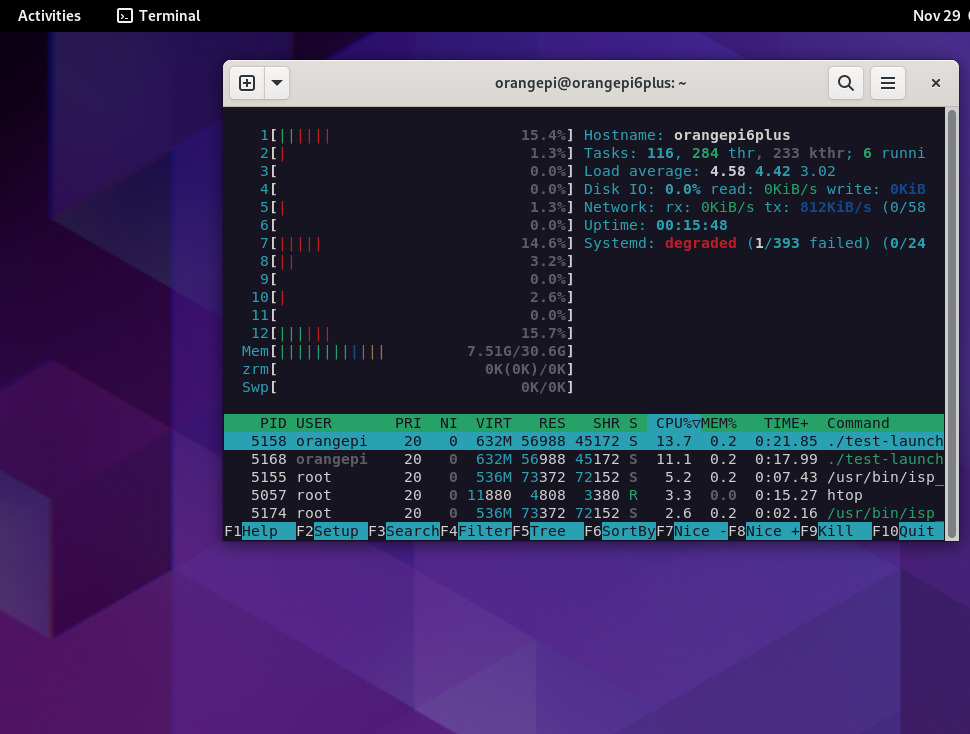
Build the GNU test-launch for the RTSP server experiment:
cd rtsp
LD_LIBRARY_PATH=/usr/share/cix/lib gcc -O2 -o test-launch test-launch.c -I/usr/share/cix/include/gstreamer-1.0/ -I/usr/include/glib-2.0/ -I/usr/lib/aarch64-linux-gnu/glib-2.0/include -L/usr/share/cix/lib -lgstreamer-1.0 -lgstrtspserver-1.0 -lgobject-2.0 -lglib-2.0 -lpthread -lpng -lz -lm -lpthread -ldrm -ltiff -llzma -lssl
ls -la test-launch
-rwxr-xr-x 1 orangepi orangepi 71856 Nov 30 02:35 test-launch
H265 (HEVC)
./test-launch "( v4l2src device=/dev/video1 ! video/x-raw,format=NV12, width=1920, height=1080 ! videoparse width=1920 height=1080 framerate=30/1 format=nv12 ! video/x-raw,colorimetry=bt709 ! v4l2h265enc capture-io-mode=mmap output-io-mode=dmabuf extra-controls=encode,fixed_qp=28 ! video/x-h265,profile=main,level=(string)5 ! rtph265pay name=pay0 pt=96 )"
H264
./test-launch "( v4l2src device=/dev/video1 ! video/x-raw,format=NV12, width=1920, height=1080 ! videoparse width=1920 height=1080 framerate=30/1 format=nv12 ! video/x-raw,colorimetry=bt709 ! v4l2h264enc capture-io-mode=mmap output-io-mode=dmabuf extra-controls=encode,fixed_qp=28 ! video/x-h264,profile=main,level=(string)5 ! rtph264pay name=pay0 pt=96 )"
CPU Load
H265 (HEVC)
gst-launch-1.0 rtspsrc location=rtsp://192.168.254.77:8554/test latency=100 ! rtph265depay ! h265parse ! avdec_h265 ! fpsdisplaysink video-sink=autovideosink text-overlay=true sync=false
H264
gst-launch-1.0 rtspsrc location=rtsp://192.168.254.77:8554/test latency=100 ! rtph265depay ! h265parse ! avdec_h265 ! fpsdisplaysink video-sink=autovideosink text-overlay=true sync=false
RTMP (Real-Time Messaging Protocol) streaming can be used with an RTMP server, such as nginx or any other server.
In the experiment, gstreamer is used to push the camera video stream to the rtmp server (orangepi 6 plus) and gstreamer or ffmpeg as a client (x64) to decode and show the live streams.
- rtmp pusher (orange pi 6 plus)
gst-launch-1.0 v4l2src device=/dev/video1 ! video/x-raw,format=NV12, width=1920, height=1080 ! videoparse width=1920 height=1080 framerate=30/1 format=nv12 ! video/x-raw,colorimetry=bt709 ! v4l2h264enc capture-io-mode=mmap output-io-mode=dmabuf extra-controls=encode,fixed_qp=28 ! video/x-h264,profile=main,level='(string)5'! h264parse ! flvmux ! rtmpsink sync=true async=true location=rtmp://127.0.0.1/live/stream
-
rtmp clients (x64)
-
gstreamer
gst-launch-1.0 rtmpsrc location="rtmp://192.168.254.77:1935/live/stream live=1" ! flvdemux ! h264parse ! avdec_h264 ! fpsdisplaysink video-sink=autovideosink text-overlay=true sync=false -
ffmpeg
DISPLAY=:0.0 ffplay -fflags nobuffer -i rtmp://192.168.254.77:1935/live/stream
-
SDL - Simple DirectMedia Layer version 3 is the latest version used in this experiment. testffmpeg decodes (with hardware codecs) and display live streams (check: https://github.com/libsdl-org/SDL). The official testffmpeg example crashes with a coredump, so i provided a fix for that and we can display RTSP and RTMP streaming.
After cloning we can verify if it works:
cd SDL3
sudo chmod +x testffmpeg
Running testffmpeg to see if it is Okay:
./testffmpeg --video-codec av1_v4l2m2m --sprites 10 ~/test_videos/Big_Buck_Bunny_1080_10s_30MB_av1.mp4
./testffmpeg --video-codec h264_v4l2m2m --sprites 10 ~/test_videos/Big_Buck_Bunny_1080_10s_30MB_h264.mp4
RTSP with H265 (hevc) - Client Orange Pi 6 Plus
./testffmpeg --video-codec hevc_v4l2m2m rtsp://127.0.0.1:8554/test
RTSP with H264 - Client Orange Pi 6 Plus
./testffmpeg --video-codec h264_v4l2m2m rtsp://127.0.0.1:8554/test
For the best performance, prepend SDL_VIDEO_DRIVER=wayland otherwise SDL3 will use x11
SDL_VIDEO_DRIVER=wayland ./testffmpeg --video-codec h264_v4l2m2m rtsp://127.0.0.1:8554/test
An SDL3 app for testing, checking if we can capture frames from the MIPI-CSI camera without requiring Gstreamer.
Checking if opengles2 is working (ESC to quit):
cd SDL3
sudo chmod +x SDL3_test
./sdl3_test
Testing if we can capture frames using V4l2:
cd SDL3
sudo chmod +x sdl_capture
Open a Terminal and run (ESC to quit):
./sdl_capture -format NM12 -device /dev/video1 -size 1920x1080
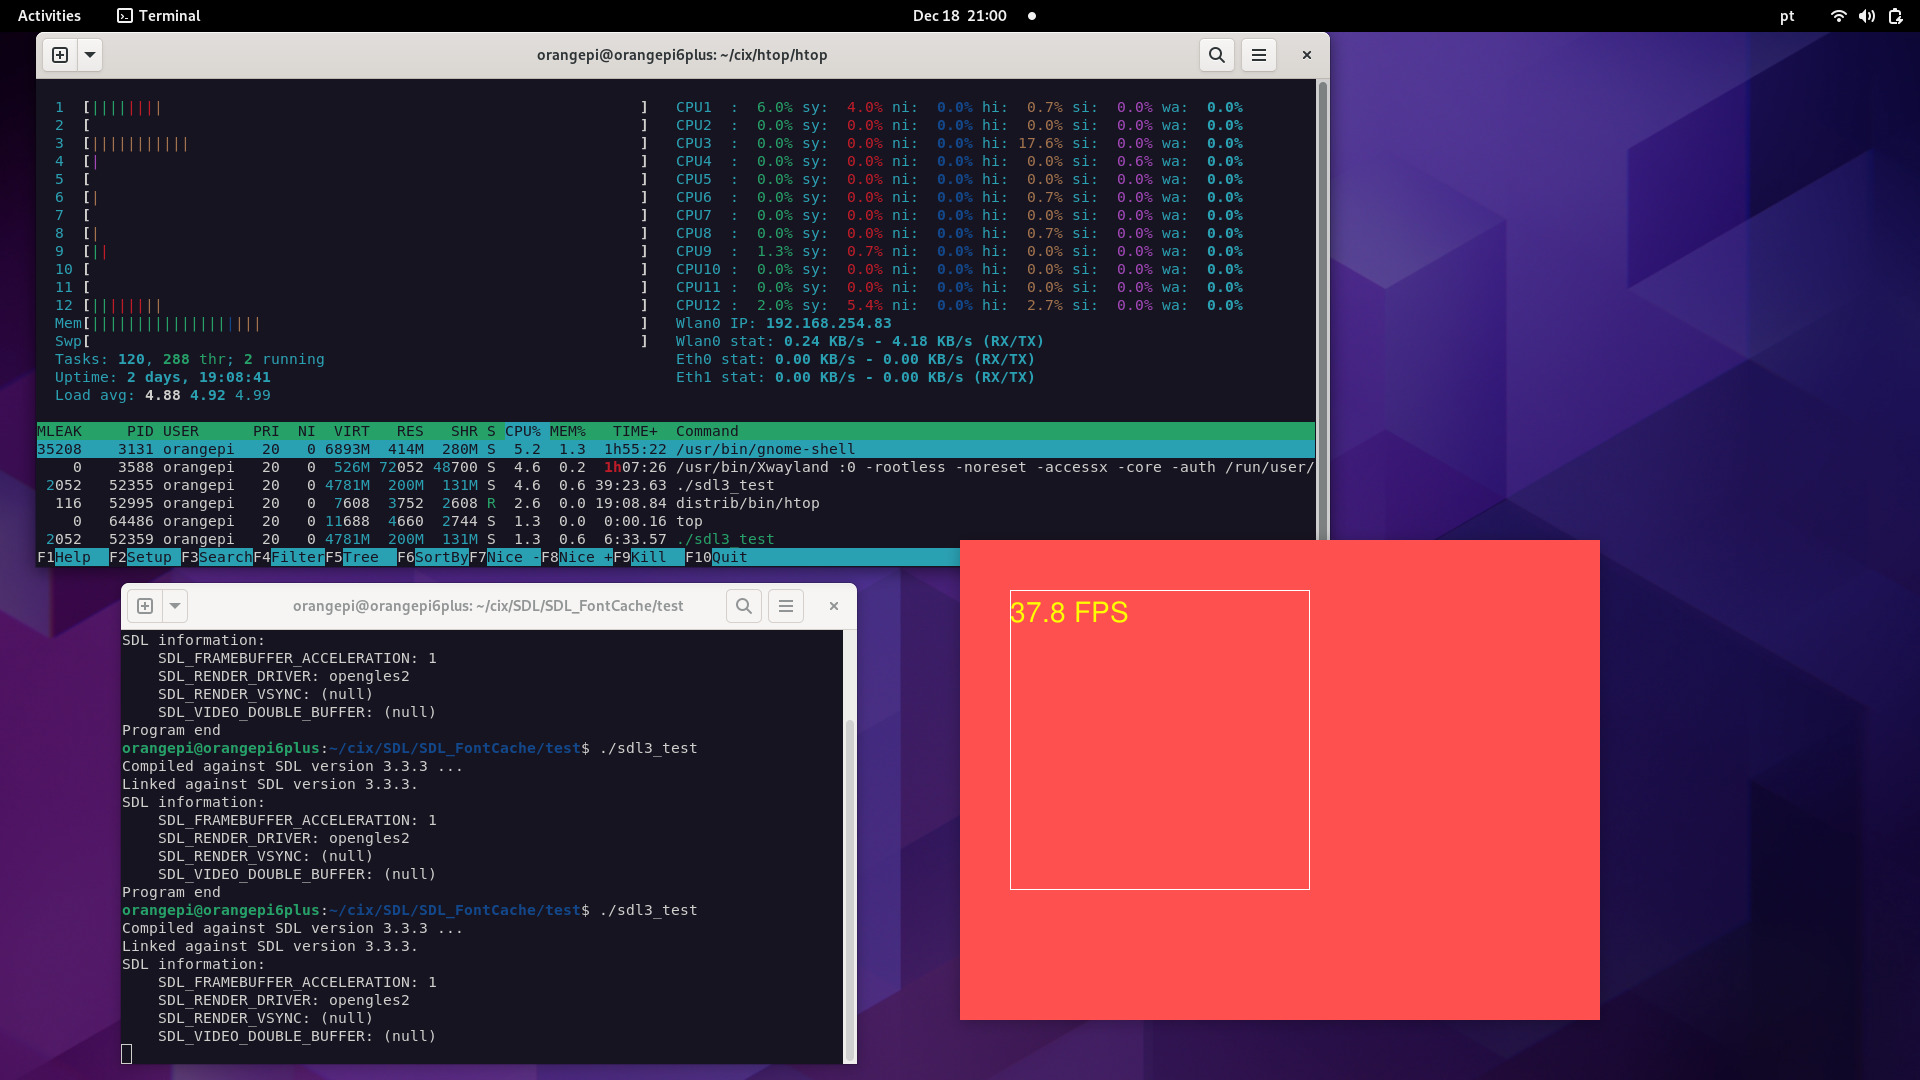
SDL3 v4l2 (CPU%)

Gstreamer (CPU%)
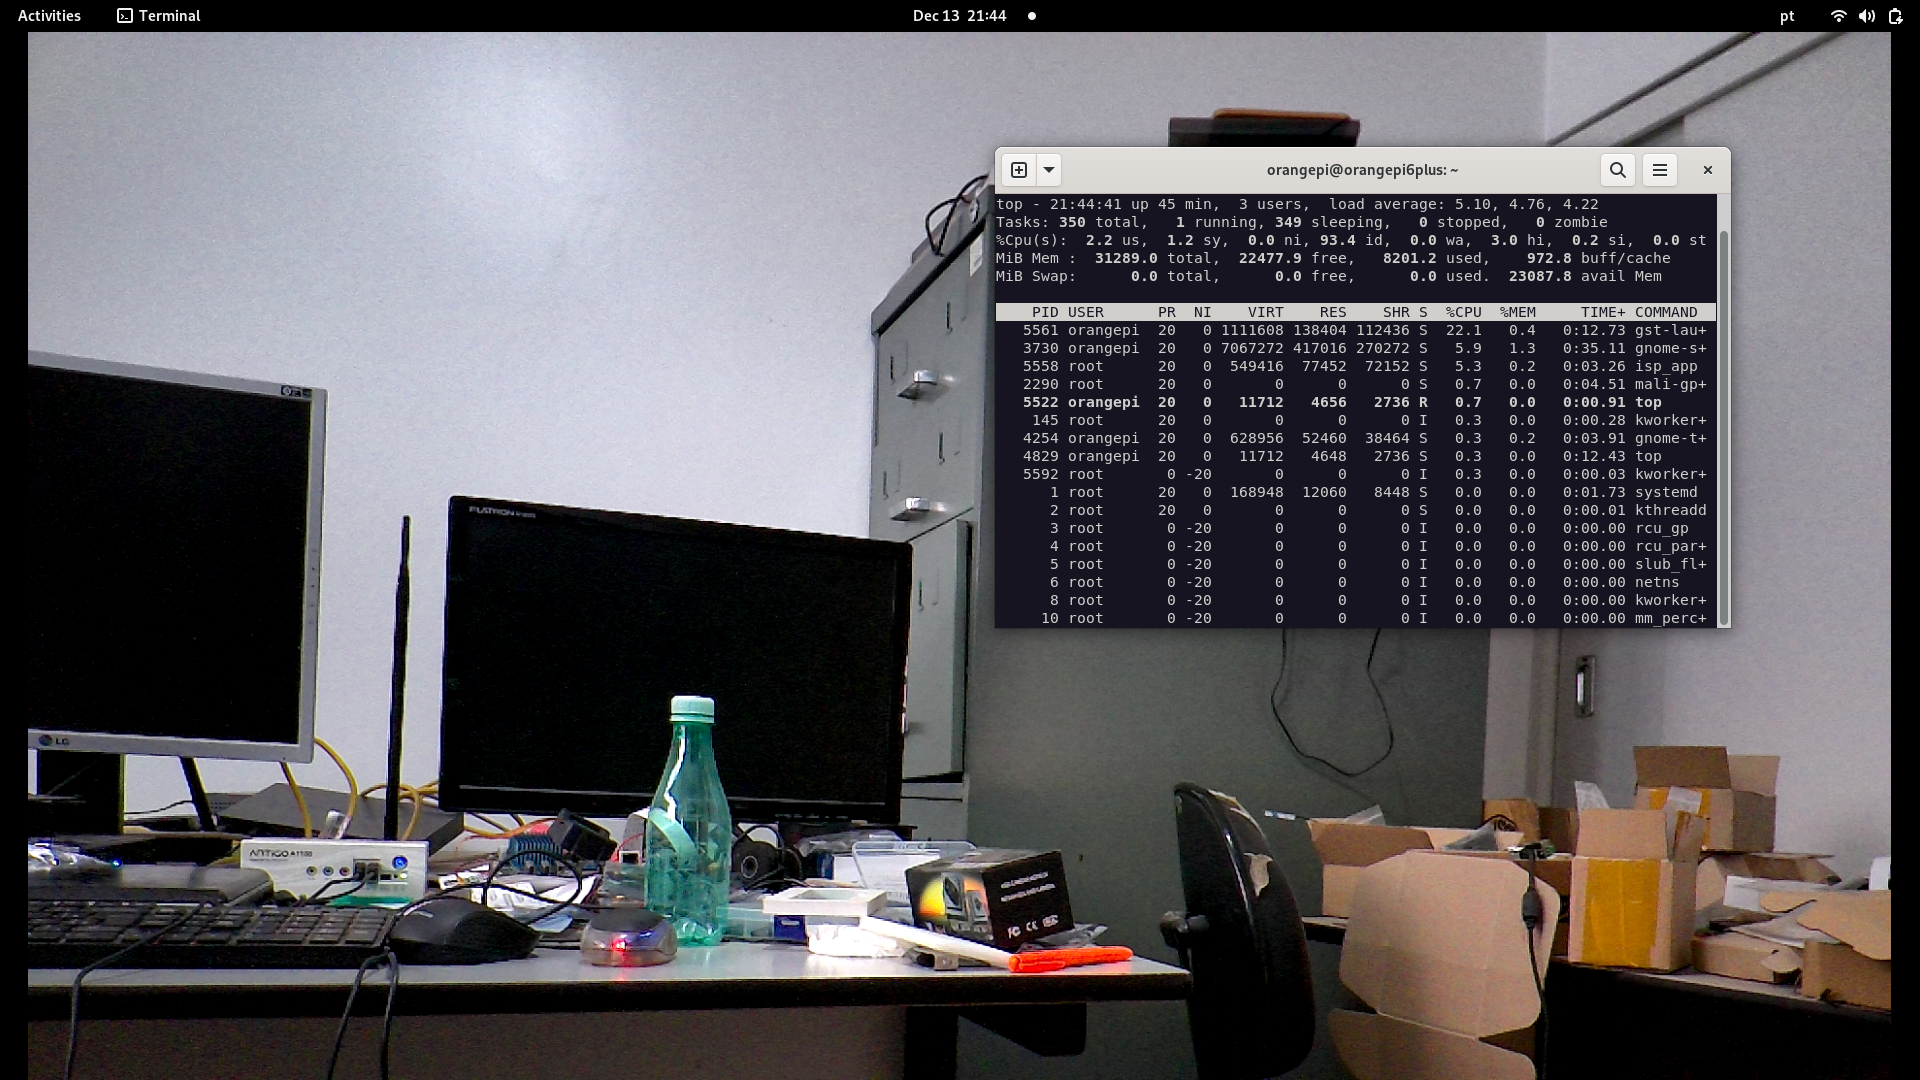
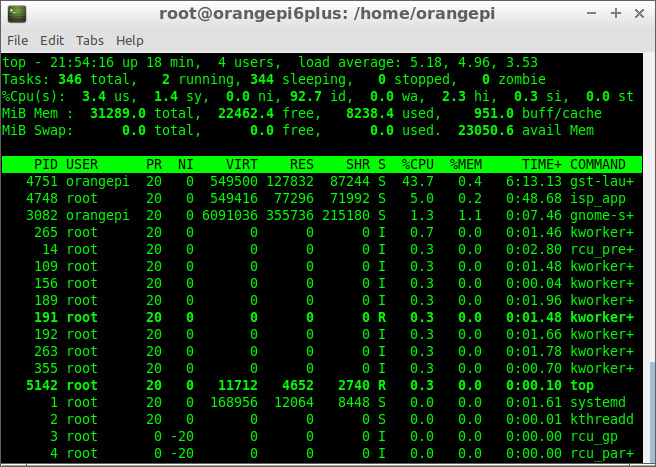
A modified version of the Htop to monitor the health of the board, CPU usage, wlan and eth (1 and 2).
cd htop
make -f Makefile
ls distrib/bin/
htop
#running
distrib/bin/htop
- Add the new Meters: CPUx (1...12), Wlan0, Eth0 and Eth1
- Mark in F2 -> Display Options -> [x] Detailed CPU Time (System/IO-Wait/Hard-IRQ/Soft-IRQ/Steal/Guest)
- Change Colors if you use Gnome-terminal
The NPU experiments with the camera will be possible when cix-opencv deb package is available, it might have some Hardware acceleration. Update: Orangepi Xunlong has told me CIX has not modified cix-opencv and we can use upstream OpenCV. Install OpenCV or build the upstream OpenCV as usual.
For the experiments i overclocked it to "performance" and in Debian Settings i selected Performance
echo performance | sudo tee /sys/devices/system/cpu/cpu*/cpufreq/scaling_governor
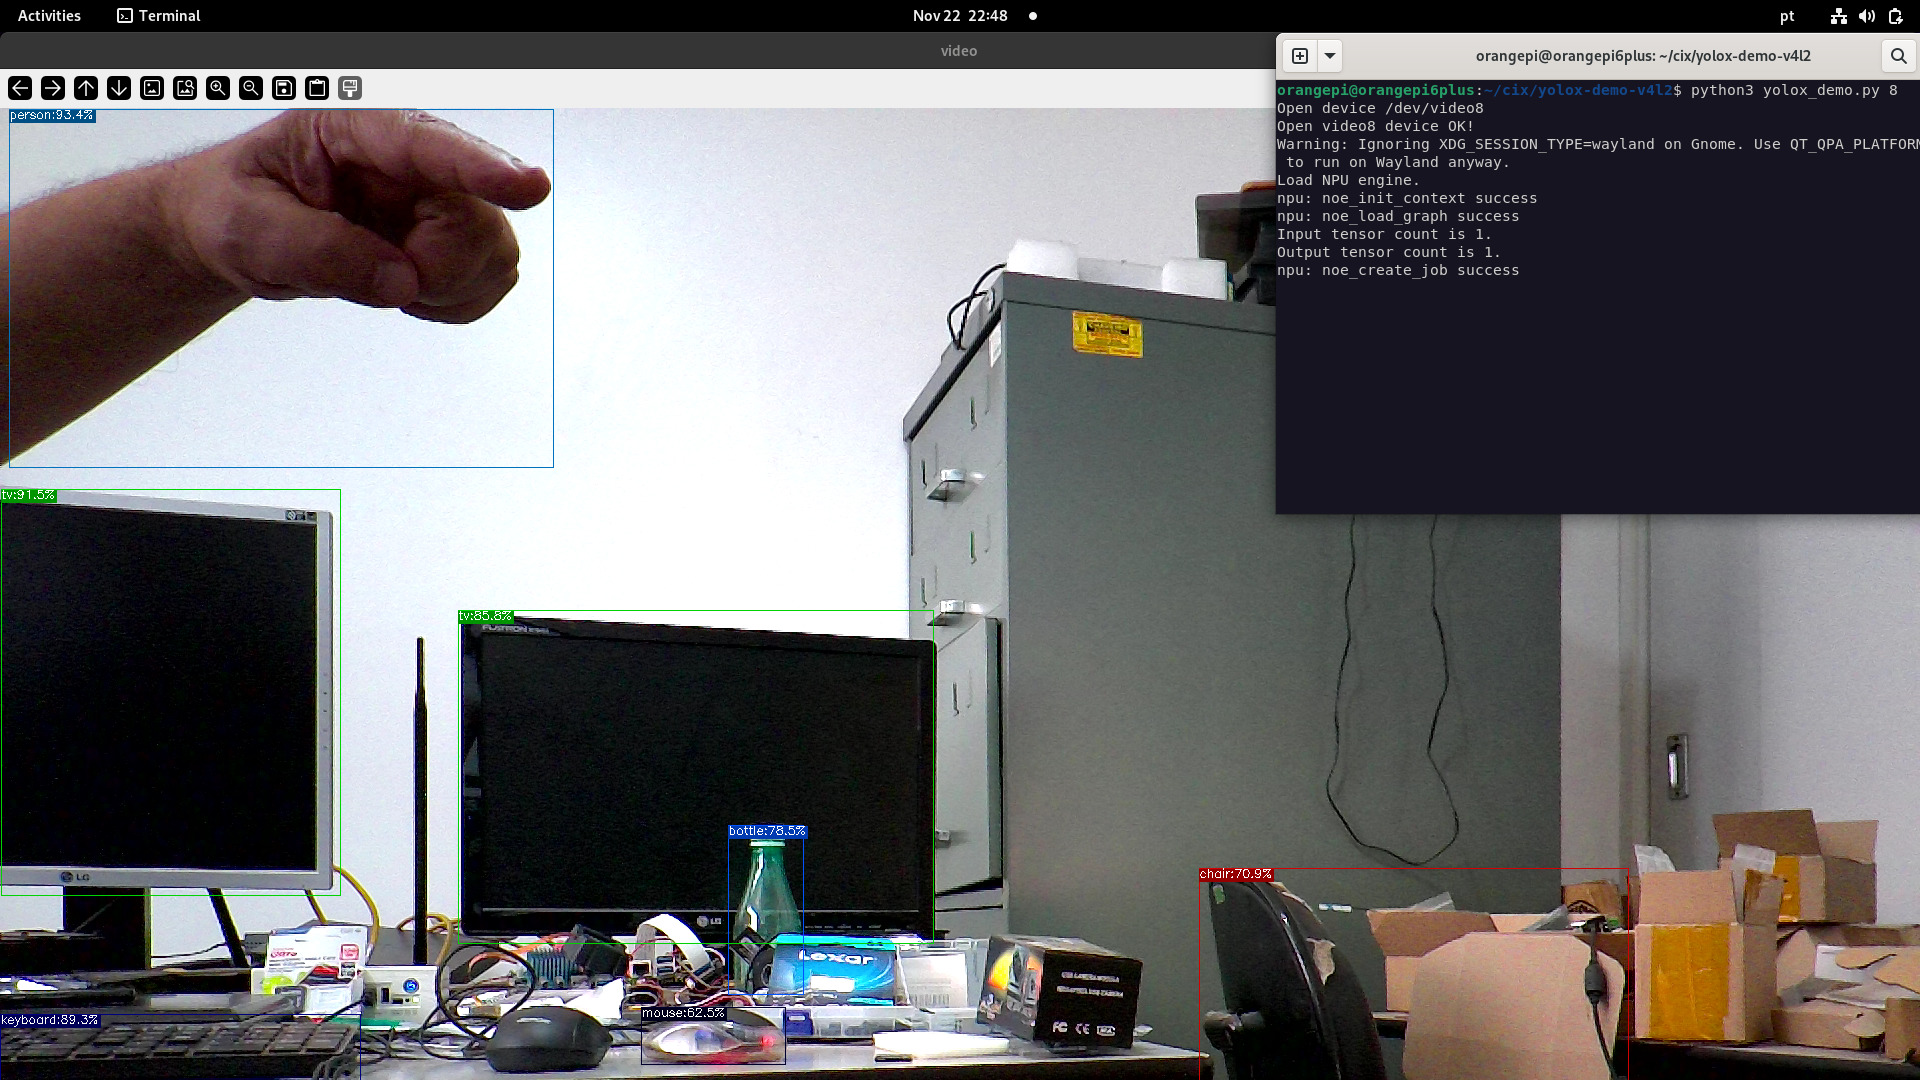
To check if NPU is running fine i used the C++ example from here:
https://github.com/swdee/orion-o6-npu-yolov8
The results:
./yolov8 yolov8n.cix bus.jpg 0.30 0.45
NOE context initialized
Model/Graph loaded
Created Job: 4294967297
Tensor Counts, Input=1, Output=1
Input tensor descriptor:
  id:          0
  size:        1228800
  scale:       255
  zero_point:  0
  data_type:   U8
Output tensor descriptor:
  id:          0
  size:        1411200
  scale:       1
  zero_point:  0
  data_type:   F16
Tensor load time: 0.056068 ms
Inference sync time: 14.2102 ms
Fetch outputs time: 2.99879 ms
person 0.879 (108,236,224,540)
person 0.879 (211,240,284,508)
person 0.844 (476,219,560,516)
bus 0.805 (100,132,552,445)
As the board is small and has the performance governor set, the results can vary across experiments.
I think the results could be improved if they release new optimizations and source code.
I also set tue VPU to "performance" but no real improvement.
echo performance | tee /sys/class/devfreq/14230000.vpu/governor
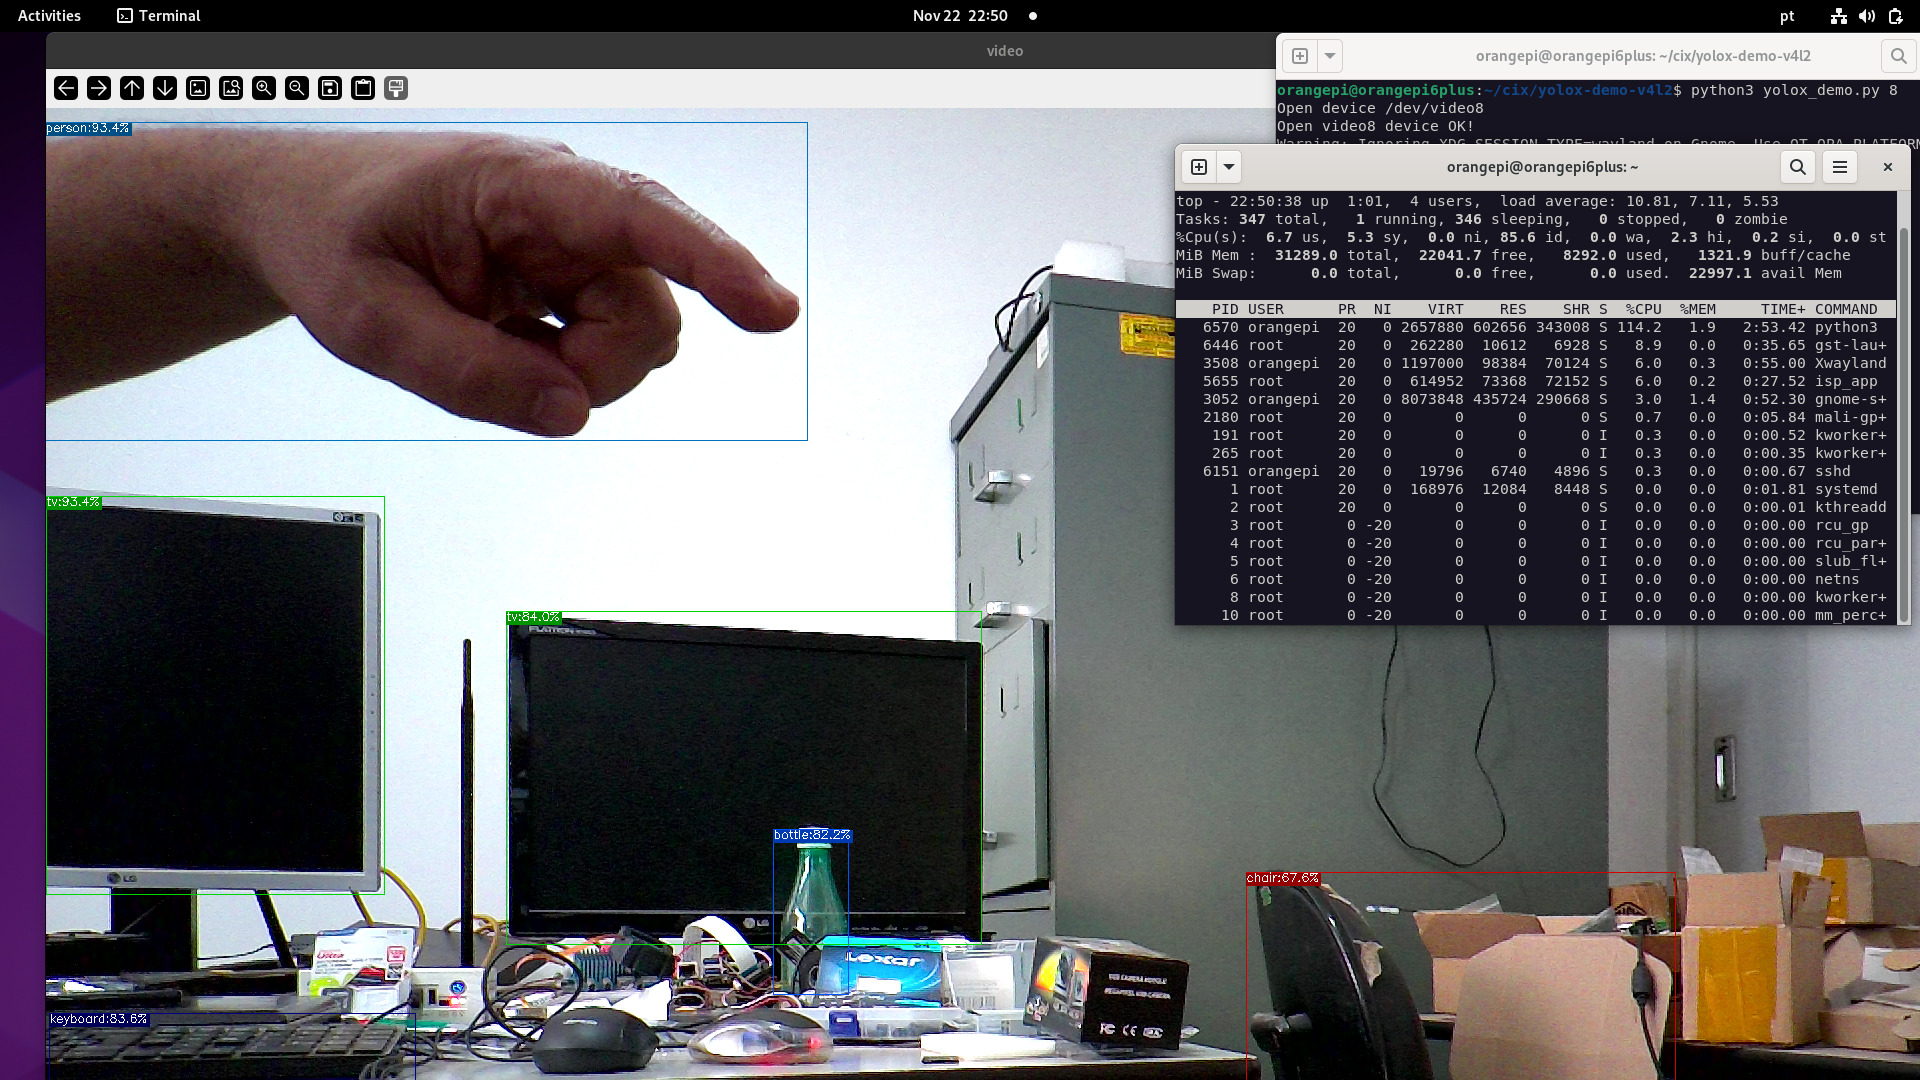
With the help of v4l2loopback i'm able to run python3 yolox demo v4l2 from the SDK.
The trick is to redirect the camera output to an v4l2looback device, in the example below we can see NPU inference with live streaming using a Webcam 720p and mipi-csi ov13855 (1920x1080). Webcam does not require the use of v4l2loopback.
NPU with webcam

NPU with MIPI-CSI camera (ov13855)
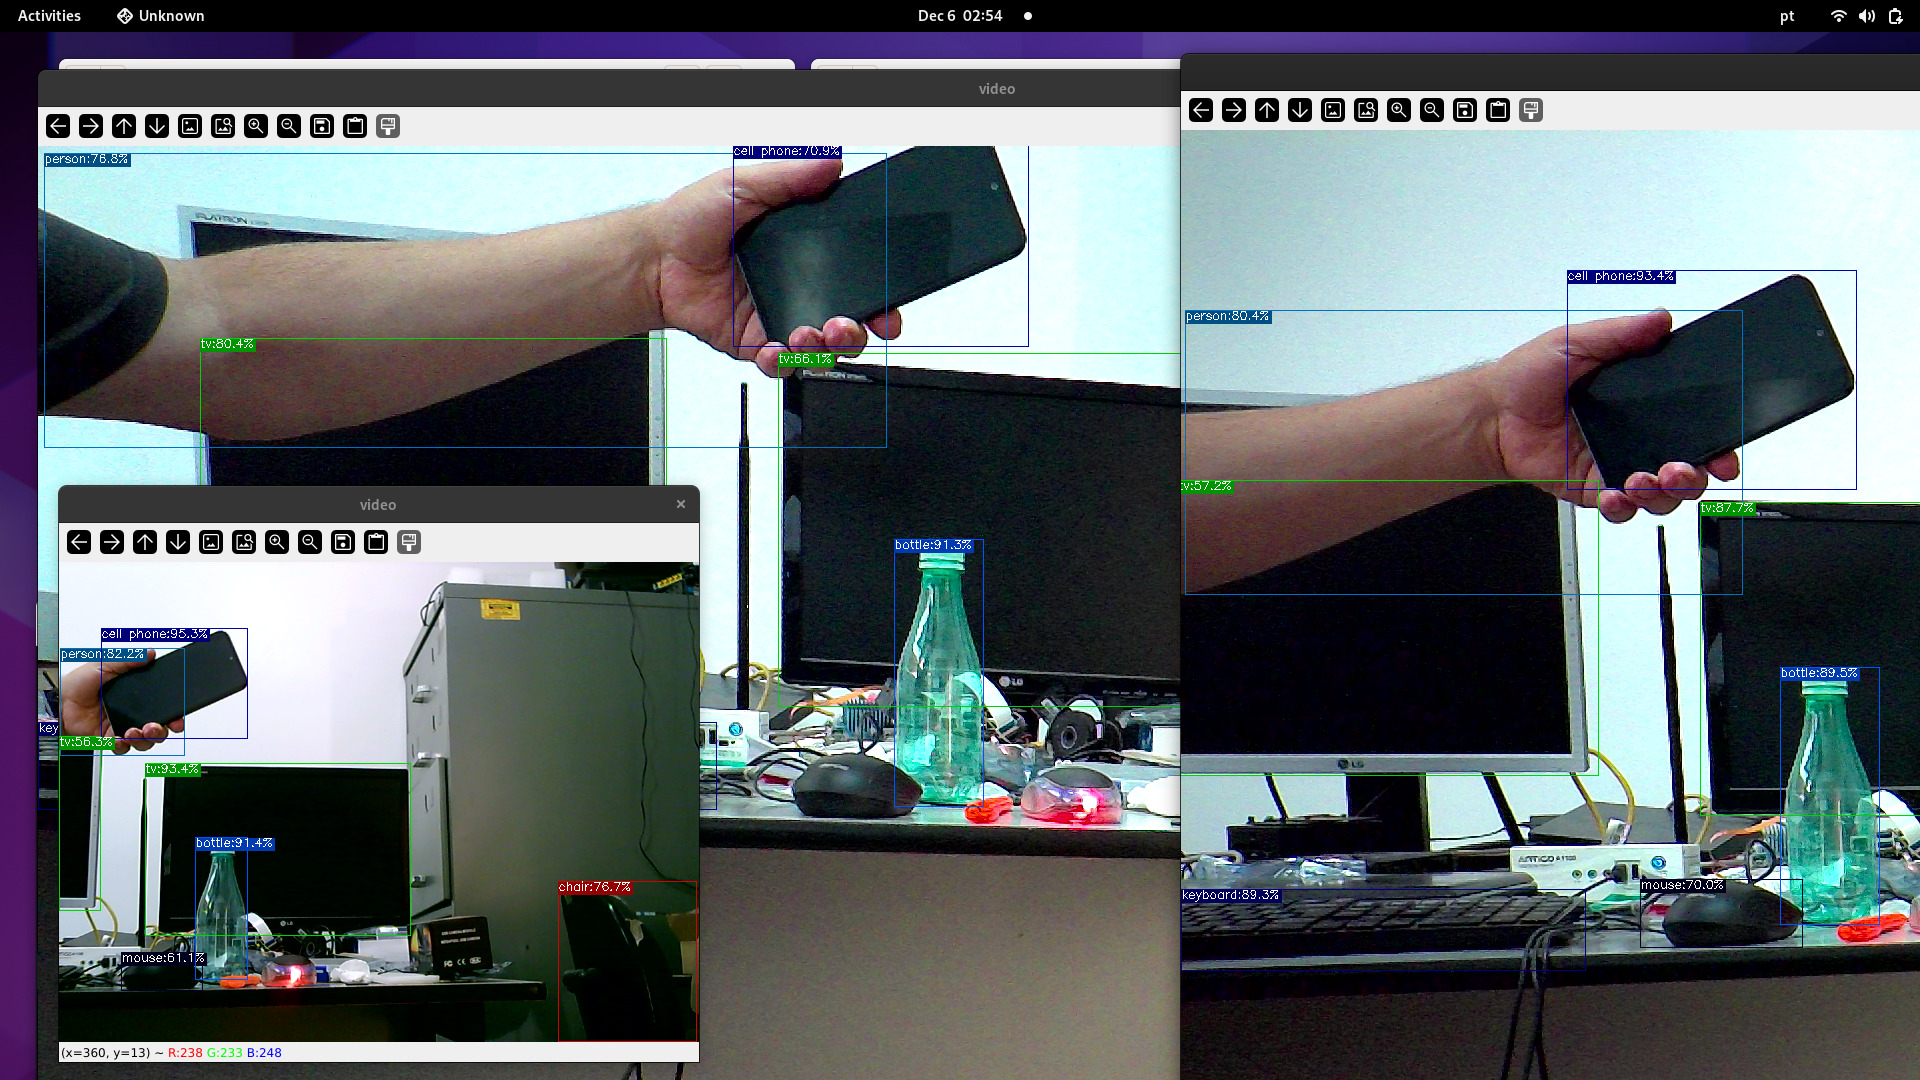
Stressing NPU with 2 mipi-csi cameras (ov13855) plus webcam 720p, using python3 and v4l2loopback.
sudo modprobe v4l2loopback devices=2
Created new device nodes for the 2 mipi-csi cameras and the webcam 720p:
ls /dev/video*
/dev/video0  /dev/video3  /dev/video6  /dev/video9
/dev/video1  /dev/video4  /dev/video7  /dev/video-cixdec0
/dev/video2  /dev/video5  /dev/video8
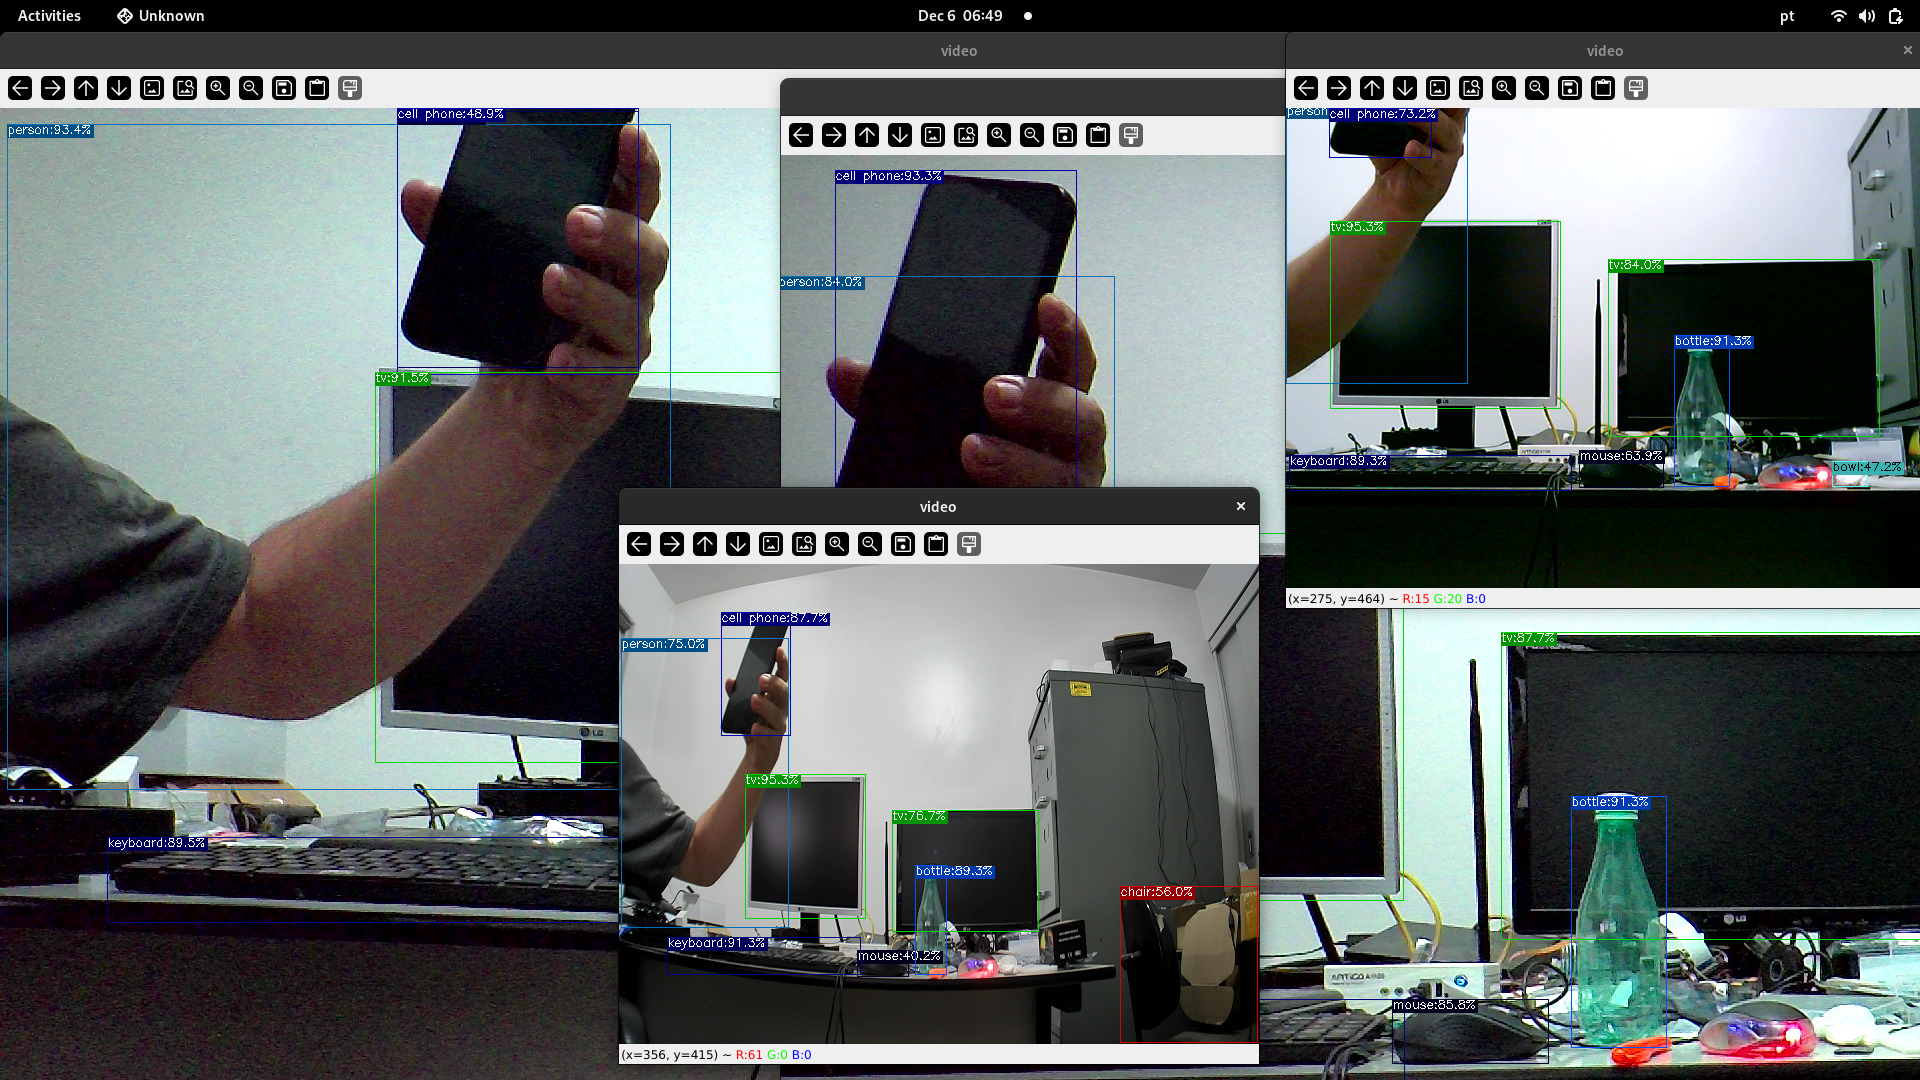
Multiple cameras:
Multiple cameras stress test:
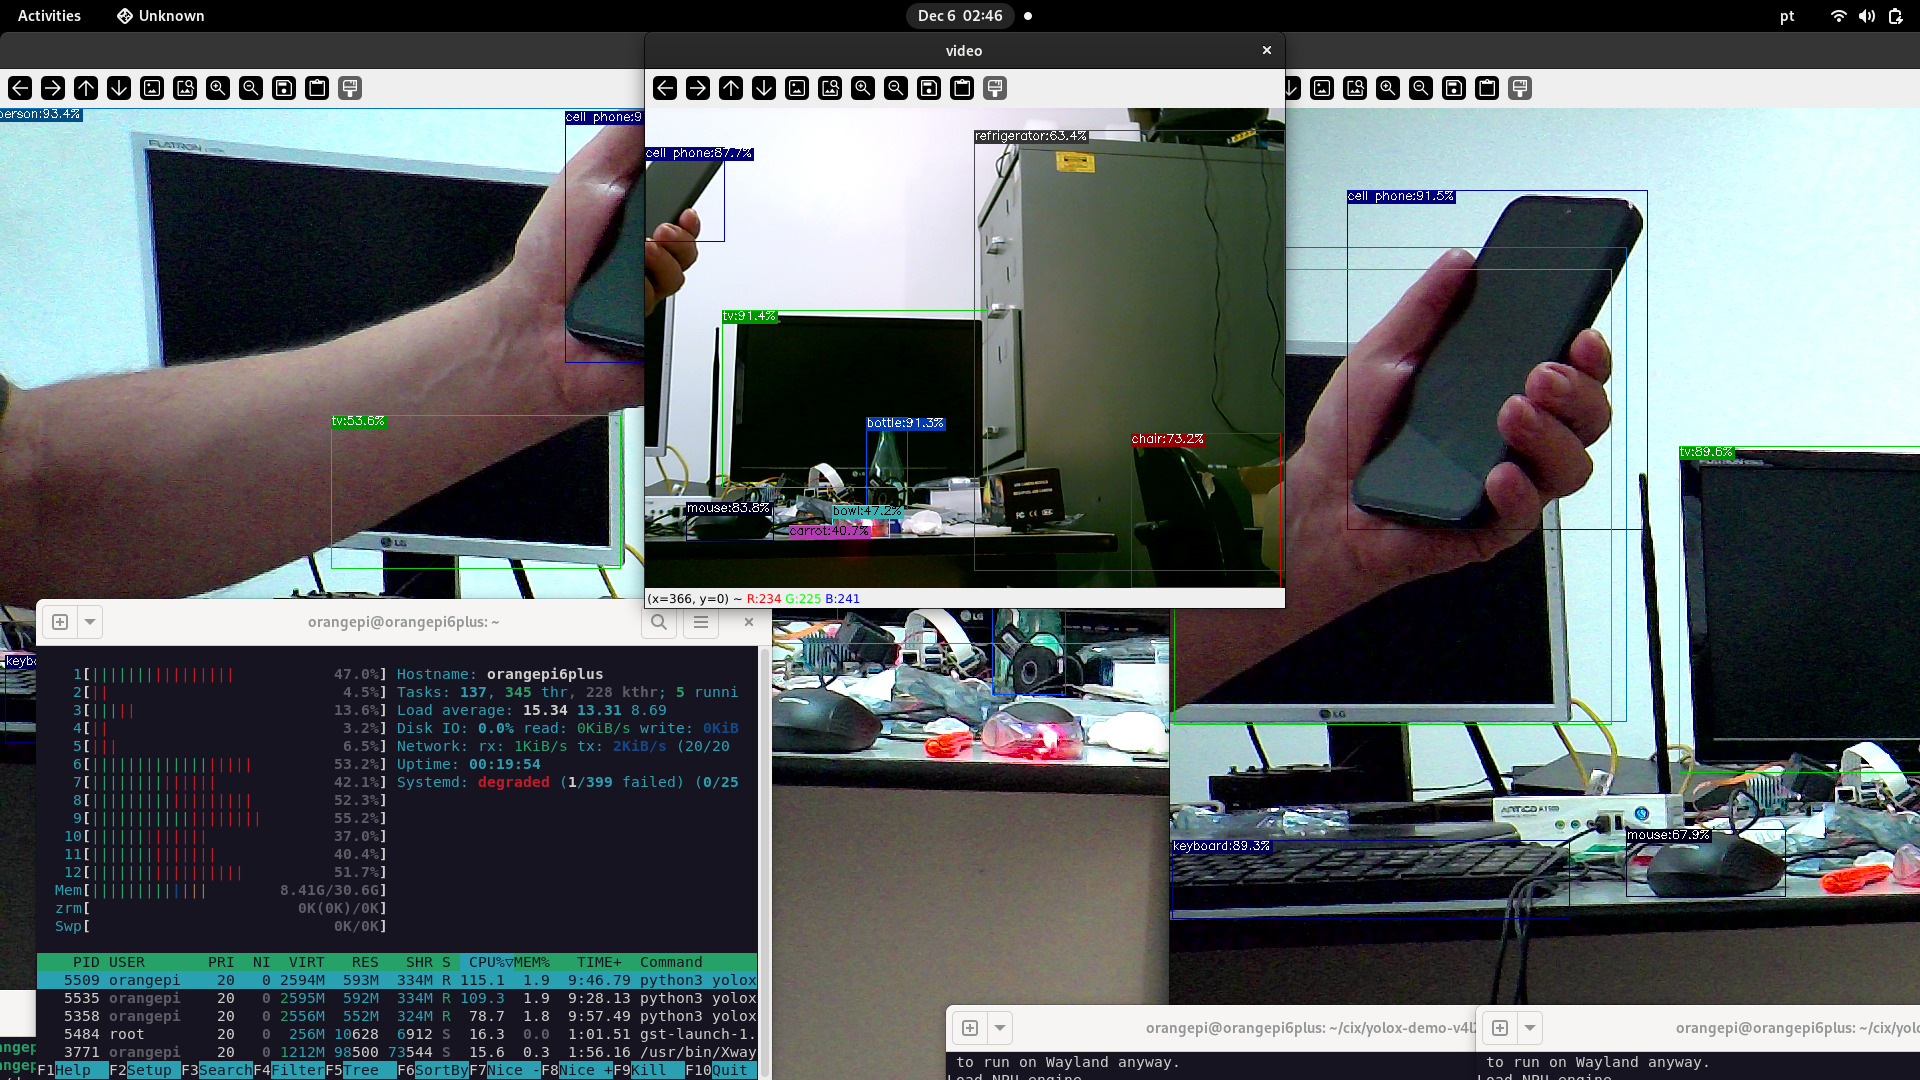
4 cameras stress test - 2 csi (1920x1080) + 2 USB 2.0 (640x480) + NPU:
ls /dev/video*
/dev/video0   /dev/video11  /dev/video4  /dev/video7  /dev/video-cixdec0
/dev/video1   /dev/video2   /dev/video5  /dev/video8
/dev/video10  /dev/video3   /dev/video6  /dev/video9
It ran for more than 15 min but the MIPI-CSI cameras crashed the v4l2 isp, webcam was still running.
In this experiment, we analyze Python vs C++ to see how the results of NPU + mp4 compare.
- The python3 uses OpenCV + software decoding the mp4 file + QT window output + yolox_l NPU model.
- The C++ version uses FFmpeg + hardware decoding the mp4 file + wayland output + yolov8n.cix NPU model.
to be completed
Which is the best option for media player, FFmpeg or GStreamer or MPV or testffmpeg?
For this experiment and to try to reach some concrete conclusion, we will use a file in mp4 format, with av1 10-bit codec and 1920x1080 resolution, and see which one is able to decode and display this on the screen.
Create test_videos directory if you haven't done it following the SDK:
cd ~
mkdir -p test_videos #create a test_videos dir if not created
cd test_videos
Download the av1 10-bit file:
wget http://download.opencontent.netflix.com.s3.amazonaws.com/AV1/Sparks/Sparks-5994fps-AV1-10bit-1920x1080-2194kbps.mp4
Check the content:
ffprobe /home/orangepi/test_videos/Sparks-5994fps-AV1-10bit-1920x1080-2194kbps.mp4
ffprobe version 5.1.6-0+deb12u1+cix.2503.radxa Copyright (c) 2007-2024 the FFmpeg developers
  built with gcc 12 (Debian 12.2.0-14)
  configuration: --prefix=/usr --extra-version=0+deb12u1+cix.2503.radxa --toolchain=hardened --libdir=/usr/lib/aarch64-linux-gnu --incdir=/usr/include/aarch64-linux-gnu --arch=arm64 --enable-gpl --disable-stripping --enable-gnutls --enable-ladspa --enable-libaom --enable-libass --enable-libbluray --enable-libbs2b --enable-libcaca --enable-libcdio --enable-libcodec2 --enable-libdav1d --enable-libflite --enable-libfontconfig --enable-libfreetype --enable-libfribidi --enable-libglslang --enable-libgme --enable-libgsm --enable-libjack --enable-libmp3lame --enable-libmysofa --enable-libopenjpeg --enable-libopenmpt --enable-libopus --enable-libpulse --enable-librabbitmq --enable-librist --enable-librubberband --enable-libshine --enable-libsnappy --enable-libsoxr --enable-libspeex --enable-libsrt --enable-libssh --enable-libsvtav1 --enable-libtheora --enable-libtwolame --enable-libvidstab --enable-libvorbis --enable-libvpx --enable-libwebp --enable-libx265 --enable-libxml2 --enable-libxvid --enable-libzimg --enable-libzmq --enable-libzvbi --enable-lv2 --enable-omx --enable-openal --enable-opencl --enable-opengl --enable-sdl2 --disable-sndio --enable-libjxl --enable-pocketsphinx --enable-librsvg --enable-libdc1394 --enable-libdrm --enable-libiec61883 --enable-chromaprint --enable-frei0r --enable-libx264 --enable-libplacebo --enable-librav1e --cross-prefix=aarch64-linux-gnu- --target-os=linux --enable-shared
  libavutil      57. 28.100 / 57. 28.100
  libavcodec     59. 37.100 / 59. 37.100
  libavformat    59. 27.100 / 59. 27.100
  libavdevice    59.  7.100 / 59.  7.100
  libavfilter     8. 44.100 /  8. 44.100
  libswscale      6.  7.100 /  6.  7.100
  libswresample   4.  7.100 /  4.  7.100
  libpostproc    56.  6.100 / 56.  6.100
[libdav1d @ 0xaaaaafbacea0] libdav1d 1.0.0
Input #0, mov,mp4,m4a,3gp,3g2,mj2, from '/home/orangepi/test_videos/Sparks-5994fps-AV1-10bit-1920x1080-2194kbps.mp4':
  Metadata:
    major_brand     : iso4
    minor_version   : 1
    compatible_brands: iso4av01
    creation_time   : 2022-06-09T03:25:48.000000Z
    encoder         : GPAC-2.1-DEV-rev199-g8e29f6e8b-github_master
  Duration: 00:09:11.00, start: 0.000000, bitrate: 915 kb/s
  Stream #0:0[0x1](und): Video: av1 (Main) (av01 / 0x31307661), yuv420p10le(tv), 1920x1080, 914 kb/s, 25 fps, 25 tbr, 25k tbn (default)
    Metadata:
      creation_time   : 2022-06-09T03:25:48.000000Z
      handler_name    : obu@GPAC2.1-DEV-rev199-g8e29f6e8b-github_master
      vendor_id       : [0][0][0][0]
ffplay is a simple media player built using the FFmpeg and the SDL2.
ffplay in use here is the one that came pre-installed:
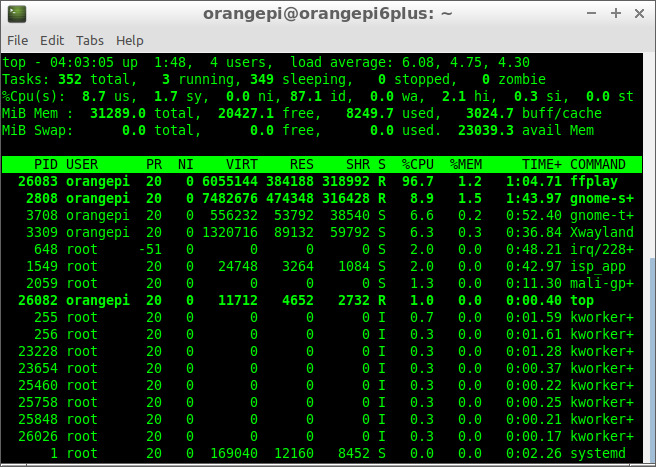
orangepi@orangepi6plus:~/cix/ffmpeg/ffmpeg-cix$ ffplay -loop 0 -i -vcodec av1_v4l2m2m ~/test_videos/Sparks-5994fps-AV1-10bit-1920x1080-2194kbps.mp4
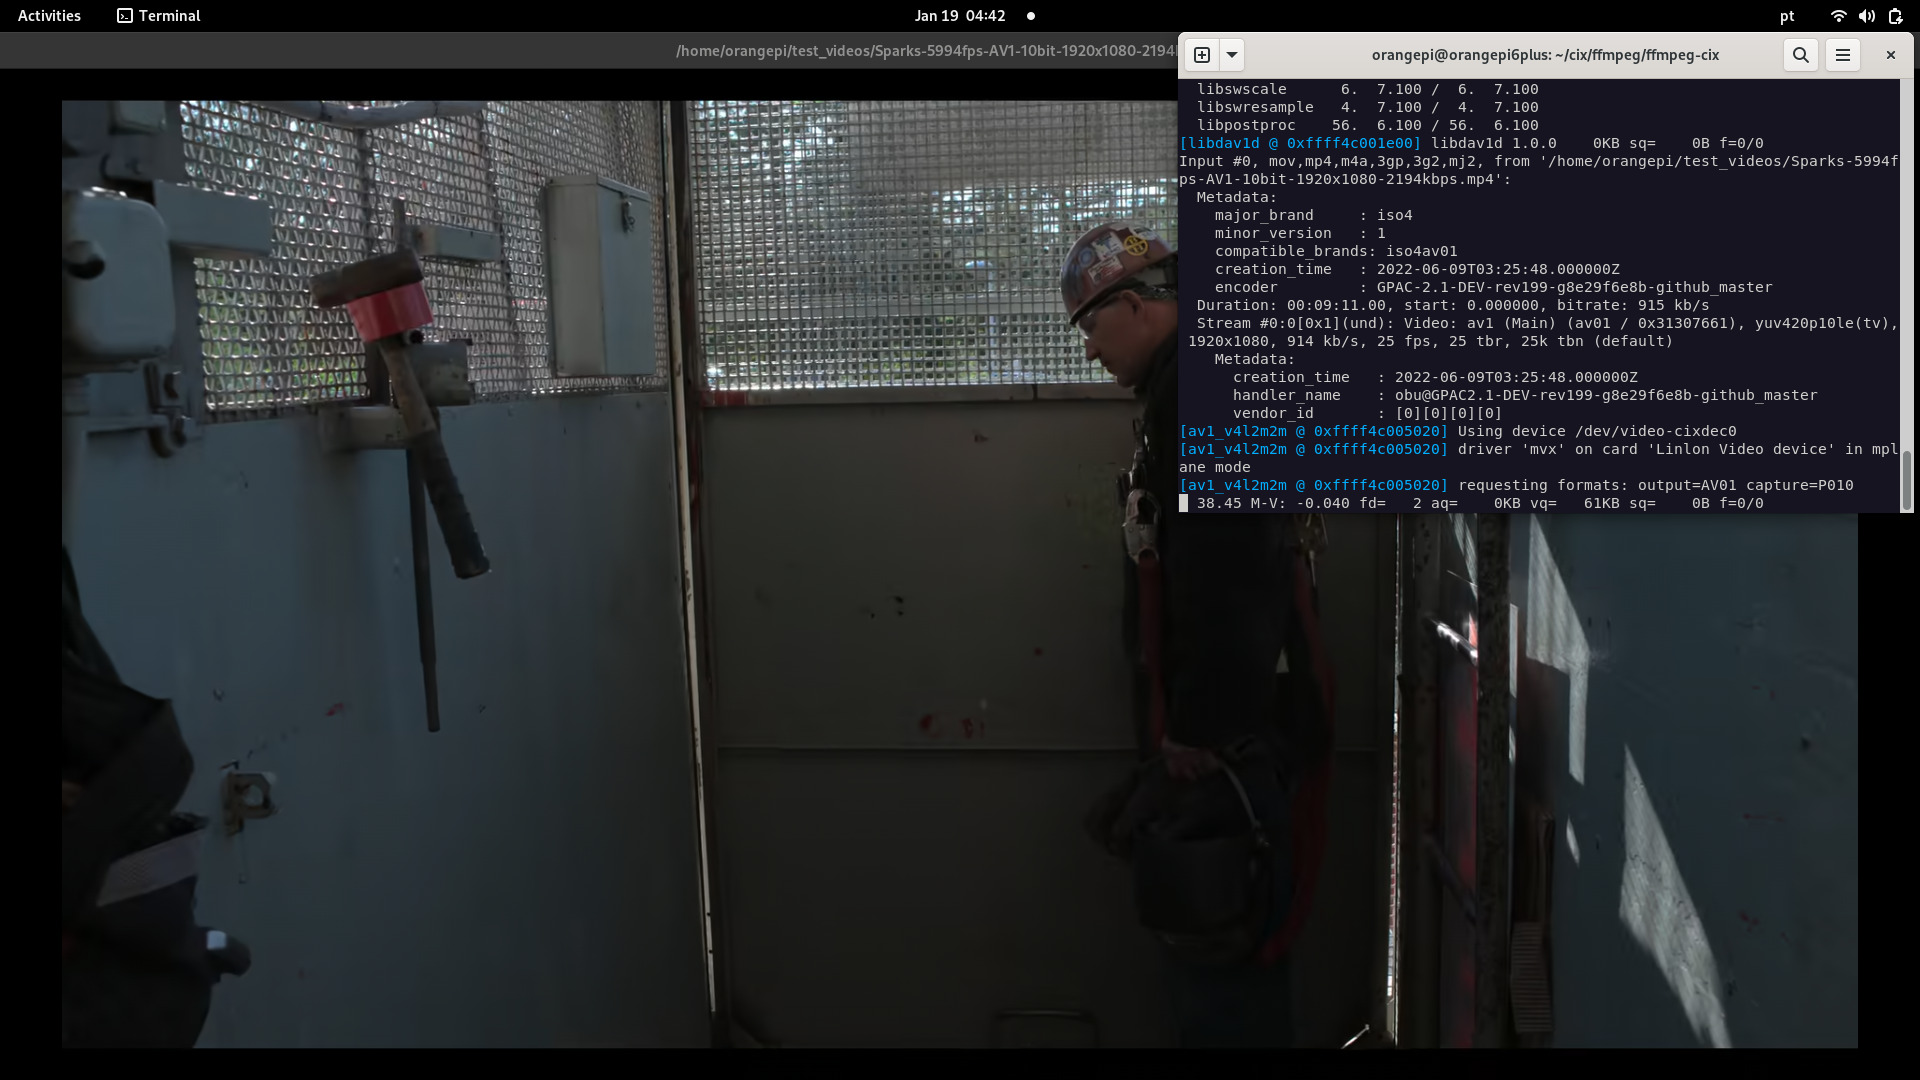
CPU load: ~95%
ffplay in use now is the compiled on board:
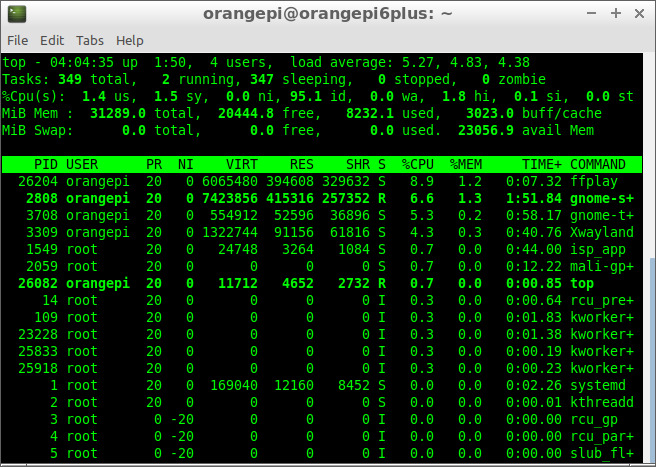
orangepi@orangepi6plus:~/cix/ffmpeg/ffmpeg-cix$ ./ffplay -loop 0 -i -vcodec av1_v4l2m2m ~/test_videos/Sparks-5994fps-AV1-10bit-1920x1080-2194kbps.mp4
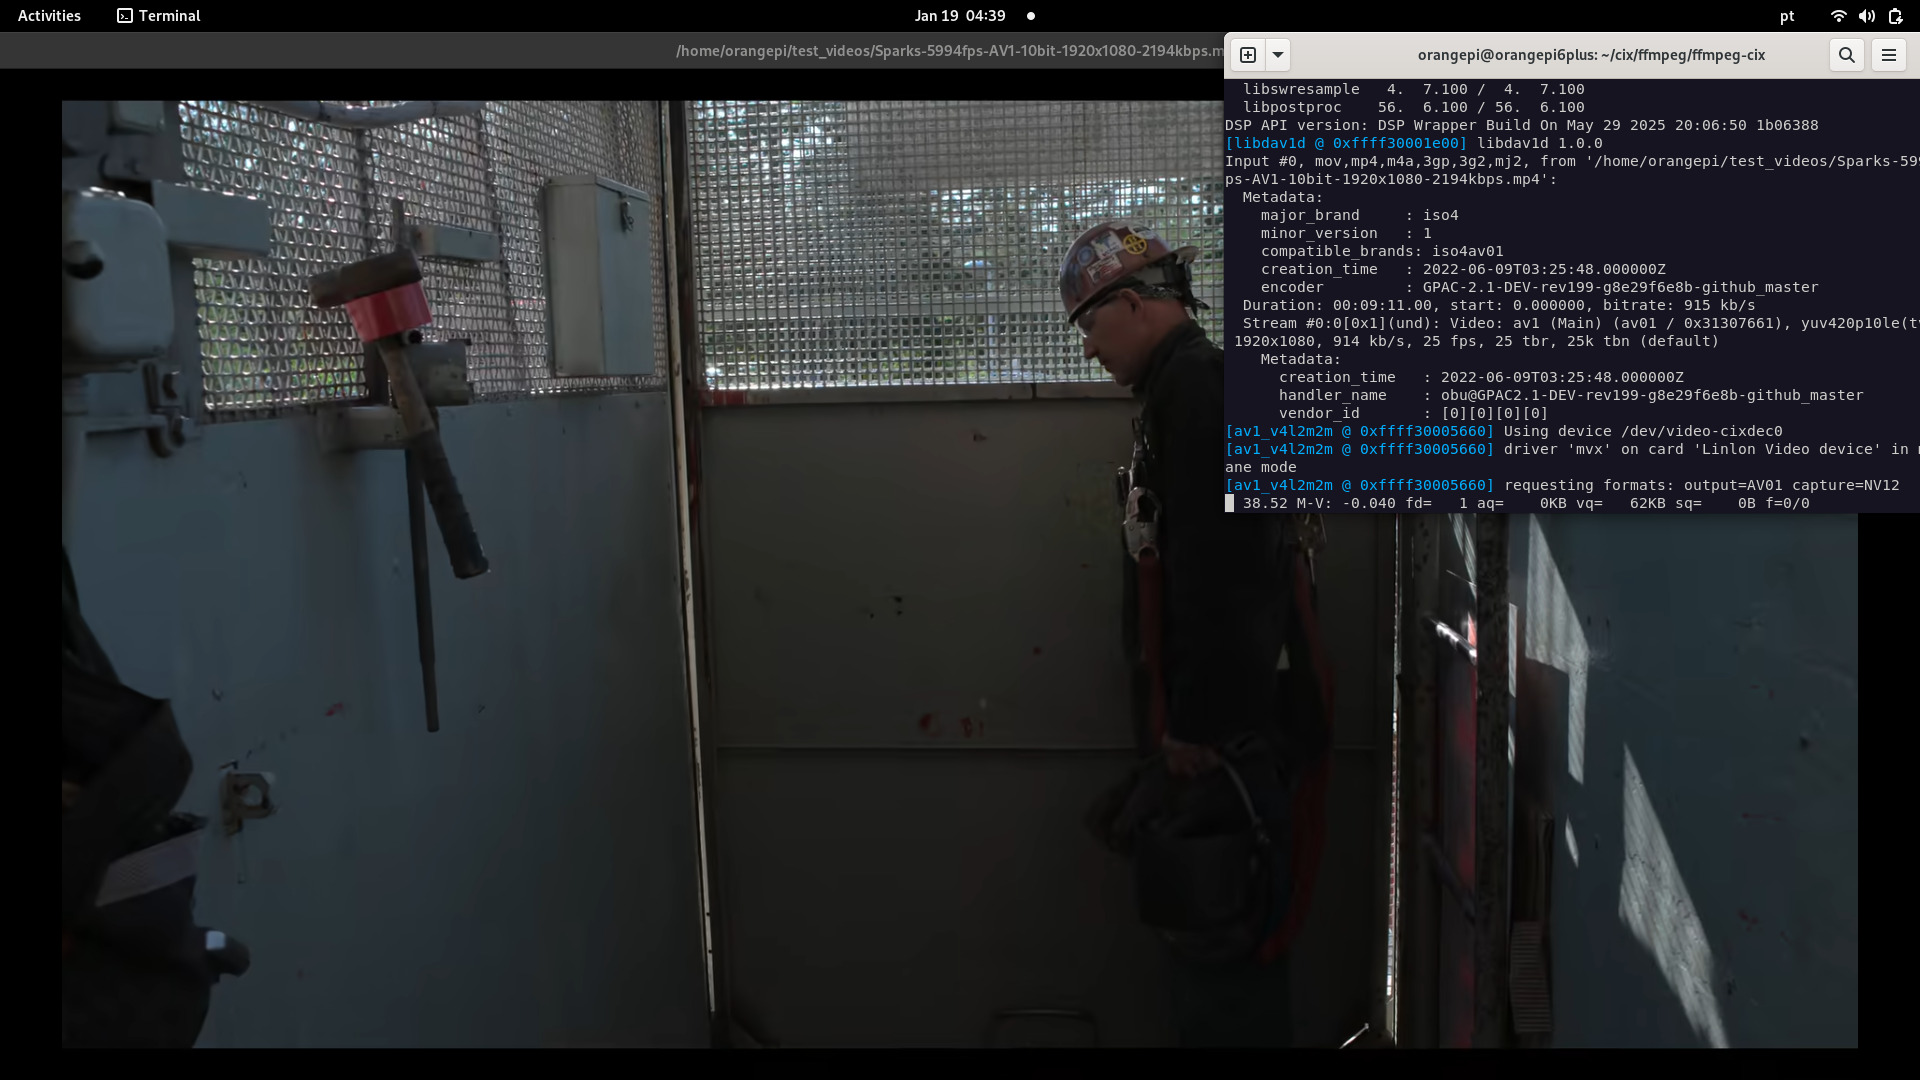
CPU load: ~9%
Possible explanation:
The pre-installed ffplay gets pixel format P010 and the one compiled on board gets pixel format NV12, P010 (HDR) carries 25% more information and SDL2 might need to convert to NV12/YUV to display it on screen, this convertion is done most likely by software.
The ffplay compiled on board seems to get NV12 (directly) , saving CPU.
I don't know why, since the ffmpeg compiled for other platforms and the one compiled on the board should be the same.
Additional info: kernel: https://docs.kernel.org/userspace-api/media/v4l/pixfmt-yuv-planar.html#p010-and-tiled-p010
gstreamer tested here is the pre-installed one, and was not able to display the stream, only a green screen:
orangepi@orangepi6plus:~/cix/ffmpeg/ffmpeg-cix$ gst-launch-1.0 filesrc location=/home/orangepi/test_videos/Sparks-5994fps-AV1-10bit-1920x1080-2194kbps.mp4 ! decodebin ! glupload ! glcolorconvert ! glcolorbalance ! glimagesink
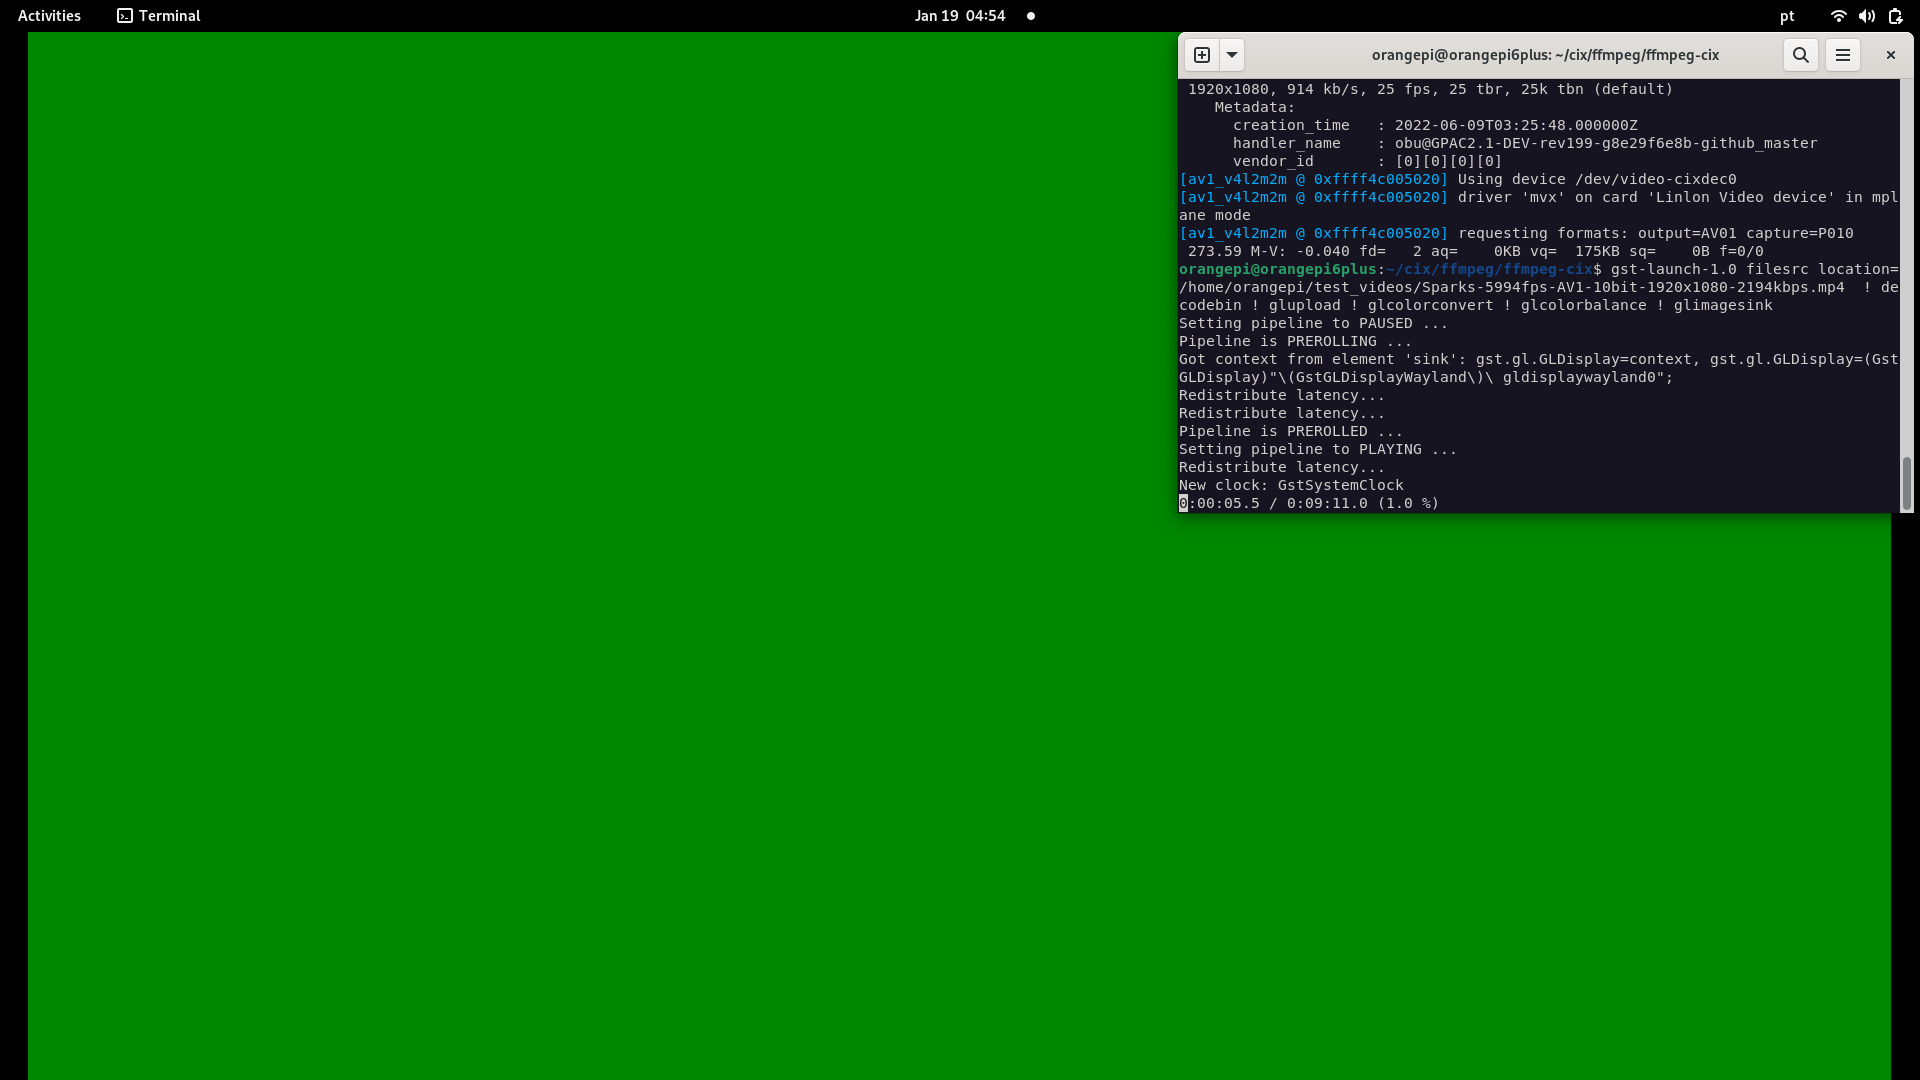
CPU load: ~6%
mpv is a de-facto media player for linux and it can handle the P010 (HDR) and render it beautifully.
It seems it is the best choice for high-end videos.
command:
mpv -hwdec=v4l2m2m-copy /home/orangepi/test_videos/Sparks-5994fps-AV1-10bit-1920x1080-2194kbps.mp4
 (+) Video --vid=1 (*) (av1 1920x1080 25.000fps)
Using hardware decoding (v4l2m2m-copy).
VO: [gpu] 1920x1080 nv12
V: 00:02:45 / 00:09:11 (30%)
CPU load: ~7%
testffmpeg can't handle pixel format P010 but compiling testffmpeg with NV12 support and Linking it with ffmpeg built natively on board can handle AV1 10-bit videos with high eficiency.
Compared to mpv , testffmpeg (SDL3) has better performance but consuming more memory.
command:
./testffmpeg --video-codec av1_v4l2m2m /home/orangepi/test_videos/Sparks-5994fps-AV1-10bit-1920x1080-2194kbps.mp4
CPU load: 6%
This experiment uses FFmpeg 8.0 with the DRM_PRIME patch, although it was designed to work with Kodi.
The performance is great. but there are still some memory leak issues to be resolved, perhaps in SDL3 or even in testffmpeg itself..
The fix has been pushed: libsdl-org/SDL#14908 (comment)
The FFmpeg version used is this one: [https://github.com/Sky1-Linux/ffmpeg-sky1], with drm_prime support recently added.
CPU load: 3~6%
This experiment is using a H264 / H265 USB 2.0 camera.
The H264 usb camera is attached to USB, and is available at video node /dev/video8. a H265 USB camera is attached to a USB3 and the video node is /dev/video10 as below.
v4l2-ctl --device=/dev/video8 --get-fmt-video
Format Video Capture:
	Width/Height      : 1920/1080
	Pixel Format      : 'H264' (H.264)
	Field             : None
	Bytes per Line    : 3840
	Size Image        : 4147200
	Colorspace        : sRGB
	Transfer Function : Rec. 709
	YCbCr/HSV Encoding: ITU-R 601
	Quantization      : Default (maps to Full Range)
	Flags             :
Display the camera content using ffplay, with little latency, 100~150 ms:
ffplay -f v4l2 -pixel_format h264 -vcodec h264_v4l2m2m -fflags nobuffer -vf "drawtext=fontfile=/usr/share/fonts/truetype/freefont/FreeMono.ttf: text='%{pts}': x=0: y=0: fontcolor=white: box=1: boxcolor=black@0.5: fontsize=24" /dev/video8
Gstreamer can't handle the colorimetry for this device.
v4l2-ctl --device=/dev/video10 --get-fmt-video
Format Video Capture:
	Width/Height      : 1920/1080
	Pixel Format      : 'HEVC' (HEVC)
	Field             : None
	Bytes per Line    : 0
	Size Image        : 4147200
	Colorspace        : sRGB
	Transfer Function : Rec. 709
	YCbCr/HSV Encoding: ITU-R 601
	Quantization      : Default (maps to Full Range)
	Flags             :
Gstreamer can't handle the required colorimetry for this device, so we use ffmpeg for that, but we need a patch for HEVC. Patch is attached.
Display the camera content using ffplay and the patch, with litle latency, around 100 ms:
ffplay -f v4l2 -pixel_format hevc -vcodec hevc_v4l2m2m -fflags nobuffer /dev/video10
USB camera h264 vs h265
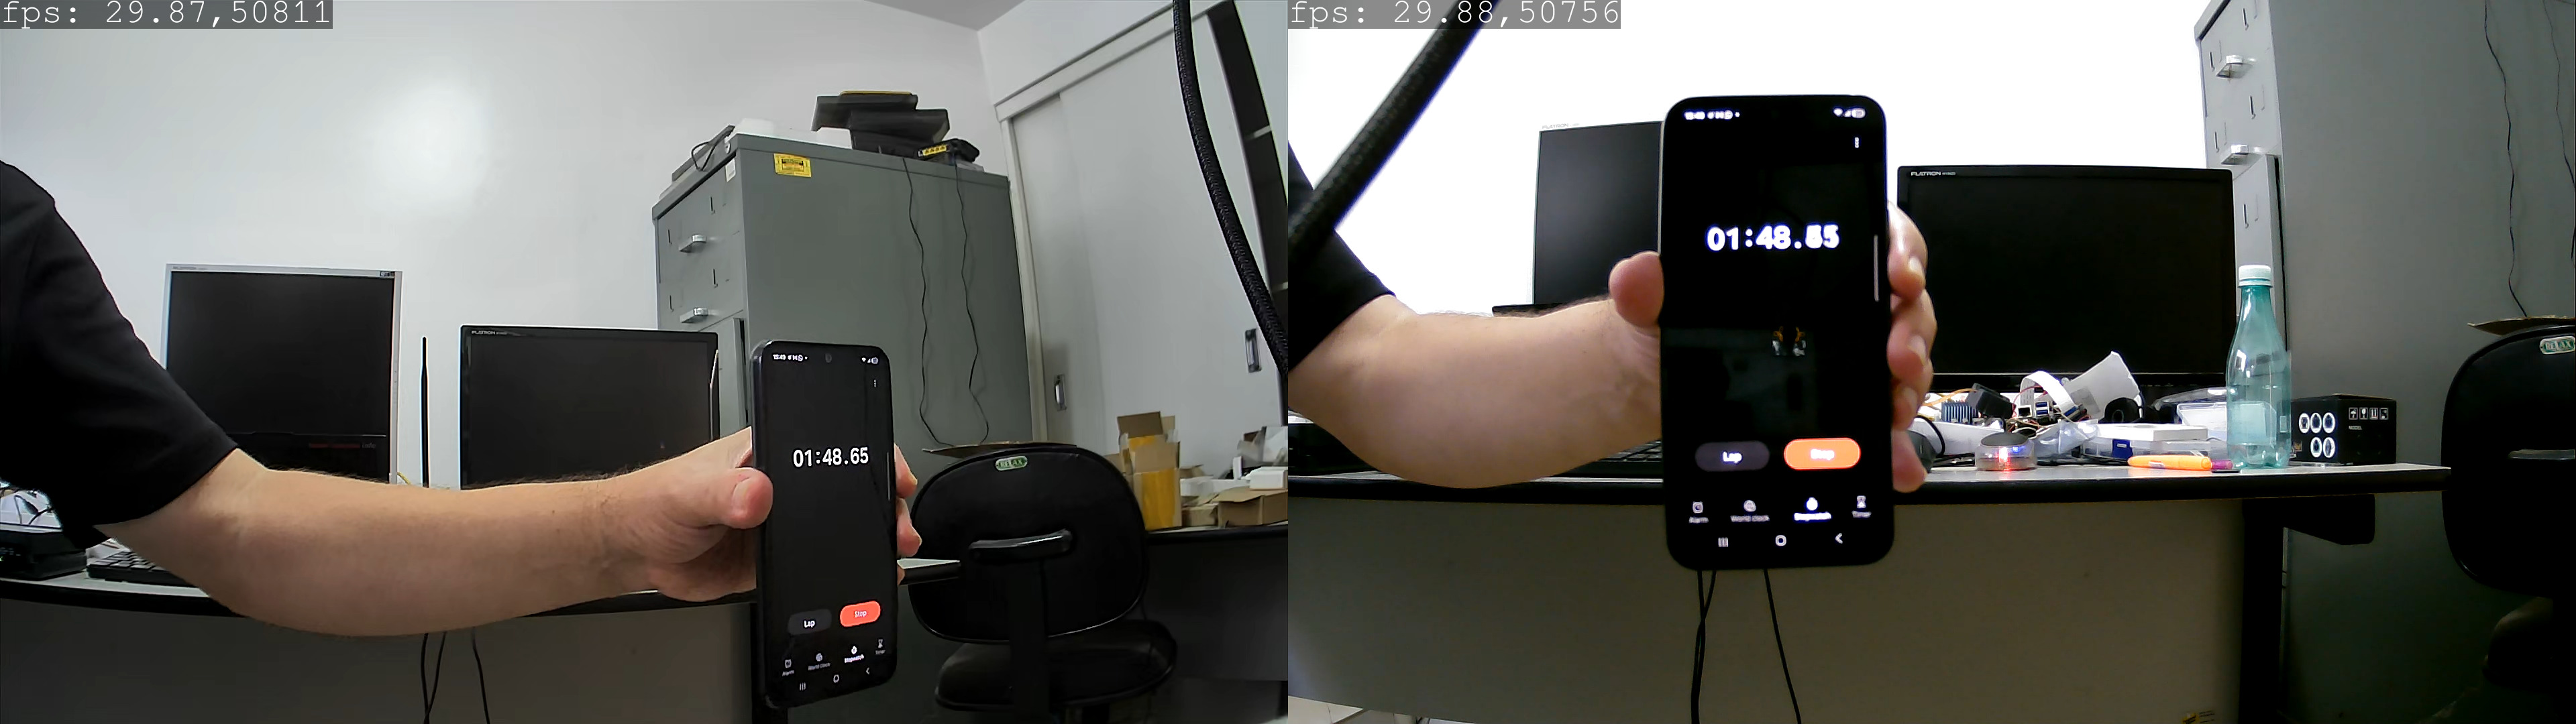
USB cam h264 connected to USB2 and USB cam H265 connected to USB3 in parallel to check for latency:

Display FPS using the filter. Patch attached.
Type in the command:
-
H265 usb cam (requires NV12 support)
ffplay -f v4l2 -pixel_format hevc -vcodec hevc_v4l2m2m -fflags nobuffer -vf "drawtext=fontfile=/usr/share/fonts/truetype/freefont/FreeMono.ttf: text='%{fps},%{frame_num}': x=0: y=0: fontcolor=white: box=1: boxcolor=black@0.5: fontsize=52" -i /dev/video10 -
H264 usb cam
ffplay -f v4l2 -pixel_format h264 -vcodec h264_v4l2m2m -fflags nobuffer -vf "drawtext=fontfile=/usr/share/fonts/truetype/freefont/FreeMono.ttf: text='%{fps},%{frame_num}': x=0: y=0: fontcolor=white: box=1: boxcolor=black@0.5: fontsize=52" -i /dev/video8
Output of the cameras on desktop:
- FFMpeg + DRM_PRIME (https://github.com/royka1/ffmpeg-sky1/) - thanks to @royka1
- FFMpeg (https://gitlab.com/cix-linux/ffmpeg_repo/ffmpeg) - thanks to Radxa
- NPU C++ (https://github.com/swdee/orion-o6-npu-yolov8/) - thanks to @swdee
- yolox_l.cix example from CIX SDK and yolon8n.cix taken from CIX SDK
- updated info about opencv (orangepi-xunlong/component_cix-current#1 (comment)) - thanks to xunlong
- Once you issue a wrong command, the kernel may crash, or a reboot is needed.
- Camera2 seems to be in preview mode
- Camera2 has some tearings, most likely a DMA buf issue
- MIPI Cameras are capped at 1920x1080
- When streaming both Camera1 and Camera2 at the same time, the latency is noticeable (My Intel Box is ancient)
- Using NPU and VPU (H265) triggers some decoding errors