Repository navigation
Expand file tree
/
Copy pathREADME.md
More file actions
924 lines (633 loc) · 44.3 KB
/
Copy pathREADME.md
File metadata and controls
924 lines (633 loc) · 44.3 KB
1
2
3
4
5
6
7
8
9
10
11
12
13
14
15
16
17
18
19
20
21
22
23
24
25
26
27
28
29
30
31
32
33
34
35
36
37
38
39
40
41
42
43
44
45
46
47
48
49
50
51
52
53
54
55
56
57
58
59
60
61
62
63
64
65
66
67
68
69
70
71
72
73
74
75
76
77
78
79
80
81
82
83
84
85
86
87
88
89
90
91
92
93
94
95
96
97
98
99
100
101
102
103
104
105
106
107
108
109
110
111
112
113
114
115
116
117
118
119
120
121
122
123
124
125
126
127
128
129
130
131
132
133
134
135
136
137
138
139
140
141
142
143
144
145
146
147
148
149
150
151
152
153
154
155
156
157
158
159
160
161
162
163
164
165
166
167
168
169
170
171
172
173
174
175
176
177
178
179
180
181
182
183
184
185
186
187
188
189
190
191
192
193
194
195
196
197
198
199
200
201
202
203
204
205
206
207
208
209
210
211
212
213
214
215
216
217
218
219
220
221
222
223
224
225
226
227
228
229
230
231
232
233
234
235
236
237
238
239
240
241
242
243
244
245
246
247
248
249
250
251
252
253
254
255
256
257
258
259
260
261
262
263
264
265
266
267
268
269
270
271
272
273
274
275
276
277
278
279
280
281
282
283
284
285
286
287
288
289
290
291
292
293
294
295
296
297
298
299
300
301
302
303
304
305
306
307
308
309
310
311
312
313
314
315
316
317
318
319
320
321
322
323
324
325
326
327
328
329
330
331
332
333
334
335
336
337
338
339
340
341
342
343
344
345
346
347
348
349
350
351
352
353
354
355
356
357
358
359
360
361
362
363
364
365
366
367
368
369
370
371
372
373
374
375
376
377
378
379
380
381
382
383
384
385
386
387
388
389
390
391
392
393
394
395
396
397
398
399
400
401
402
403
404
405
406
407
408
409
410
411
412
413
414
415
416
417
418
419
420
421
422
423
424
425
426
427
428
429
430
431
432
433
434
435
436
437
438
439
440
441
442
443
444
445
446
447
448
449
450
451
452
453
454
455
456
457
458
459
460
461
462
463
464
465
466
467
468
469
470
471
472
473
474
475
476
477
478
479
480
481
482
483
484
485
486
487
488
489
490
491
492
493
494
495
496
497
498
499
500
501
502
503
504
505
506
507
508
509
510
511
512
513
514
515
516
517
518
519
520
521
522
523
524
525
526
527
528
529
530
531
532
533
534
535
536
537
538
539
540
541
542
543
544
545
546
547
548
549
550
551
552
553
554
555
556
557
558
559
560
561
562
563
564
565
566
567
568
569
570
571
572
573
574
575
576
577
578
579
580
581
582
583
584
585
586
587
588
589
590
591
592
593
594
595
596
597
598
599
600
601
602
603
604
605
606
607
608
609
610
611
612
613
614
615
616
617
618
619
620
621
622
623
624
625
626
627
628
629
630
631
632
633
634
635
636
637
638
639
640
641
642
643
644
645
646
647
648
649
650
651
652
653
654
655
656
657
658
659
660
661
662
663
664
665
666
667
668
669
670
671
672
673
674
675
676
677
678
679
680
681
682
683
684
685
686
687
688
689
690
691
692
693
694
695
696
697
698
699
700
701
702
703
704
705
706
707
708
709
710
711
712
713
714
715
716
717
718
719
720
721
722
723
724
725
726
727
728
729
730
731
732
733
734
735
736
737
738
739
740
741
742
743
744
745
746
747
748
749
750
751
752
753
754
755
756
757
758
759
760
761
762
763
764
765
766
767
768
769
770
771
772
773
774
775
776
777
778
779
780
781
782
783
784
785
786
787
788
789
790
791
792
793
794
795
796
797
798
799
800
801
802
803
804
805
806
807
808
809
810
811
812
813
814
815
816
817
818
819
820
821
822
823
824
825
826
827
828
829
830
831
832
833
834
835
836
837
838
839
840
841
842
843
844
845
846
847
848
849
850
851
852
853
854
855
856
857
858
859
860
861
862
863
864
865
866
867
868
869
870
871
872
873
874
875
876
877
878
879
880
881
882
883
884
885
886
887
888
889
890
891
892
893
894
895
896
897
898
899
900
901
902
903
904
905
906
907
908
909
910
911
912
913
914
915
916
917
918
919
920
921
922
923
924
# AndroidSDK
Android SDK development environment Docker image
[](https://hub.docker.com/r/thyrlian/android-sdk/)
[](https://hub.docker.com/r/thyrlian/android-sdk/)
[](https://hub.docker.com/r/thyrlian/android-sdk/)
[](https://github.com/thyrlian/AndroidSDK/actions/workflows/docker-image.yml)
[](https://gitter.im/AndroidSDK-Docker/AndroidSDK-Docker)
[](https://www.androiddevdigest.com/digest-127/)
[](http://www.androidweekly.cn/android-dev-weekly-issue-114/)
[](https://hellogithub.com/periodical/volume/59/#AndroidSDK)
[](https://github.com/thyrlian/AndroidSDK)
[](https://hub.docker.com/r/thyrlian/android-sdk)
<img src="https://github.com/thyrlian/AndroidSDK/blob/master/assets/logo.png?raw=true" width="200">
<a href="https://youtu.be/YwBAqMDYFCU"><img src="https://pbs.twimg.com/media/DODnbwmXkAAbXuM.jpg" alt="Conference Talk" width="600"></a>
## Goals
* It contains the complete Android SDK enviroment, is able to perform all regular Android jobs.
* Solves the problem of "*It works on my machine, but not on XXX machine*".
* Some tool (e.g. [Infer](https://github.com/facebook/infer)), which has complex dependencies might be in conflict with your local environment. Installing the tool within a Docker container is the easiest and perfect solution.
* Works out of the box as an Android CI build enviroment.
## Philosophy
Provide only the **barebone SDK** (the latest official minimal package) gives you the **maximum flexibility** in tailoring your own SDK tools for your project. You can maintain an external **persistent** SDK directory, and mount it to any container. In this way, you don't have to waste time on downloading over and over again, meanwhile, without having any unnecessary package. Additionally, instead of one dedicated Docker image per Android API level (which will end up with a ton of images), you just have to deal with **one image**. Last but not least, according to Android's [terms and conditions](https://developer.android.com/studio/terms), one may not **redistribute** the SDK or any part of the SDK.
### Note
**Gradle** and **Kotlin compiler** come together with this Docker image merely for the sake of convenience / trial.
**[Using the Gradle Wrapper](https://docs.gradle.org/current/userguide/gradle_wrapper.html#sec:using_wrapper)**
> It is recommended to always execute a build with the Wrapper to ensure a reliable, controlled and standardized execution of the build. Using the Wrapper looks almost exactly like running the build with a Gradle installation. In case the Gradle distribution is not available on the machine, the Wrapper will download it and store in the local file system. Any subsequent build invocation is going to reuse the existing local distribution as long as the distribution URL in the Gradle properties doesn’t change.
Using the Gradle Wrapper lets you build with a precise Gradle version, in order to eliminate any Gradle version problem.
* `<your_project>/gradle/wrapper/gradle-wrapper.properties` specifies the Gradle version
* Gradle will be downloaded and unzipped to `~/.gradle/wrapper/dists/`
* `kotlin-compiler-embeddable-x.y.z.jar` will be resolved and downloaded when executing a Gradle task, it's defined in `<your_project>/build.gradle` as `classpath "org.jetbrains.kotlin:kotlin-gradle-plugin:$kotlin_version"`
## Caveat
Previously, running Android SDK update within the **Dockerfile** or inside a **container** would fail with [`AUFS`](https://en.wikipedia.org/wiki/Aufs) storage driver, it was due to hardlink move operations (during updating Android SDK) are not supported by AUFS storage driver, but changing it to other storage driver would work. Fortunately, it's not the case any more. With the latest version of Docker Engine, it works like a charm, you can do whatever you prefer. If you're not interested in the technical cause, simply skip this section (jump to the [next section](https://github.com/thyrlian/AndroidSDK#getting-started)).
What happens if the update fails?
```bash
ls $ANDROID_HOME/cmdline-tools/tools/
#=> empty, nothing is there
# tools such as: android, sdkmanager, emulator, lint and etc. are gone
android
#=> bash: android: command not found
sdkmanager
#=> bash: /opt/android-sdk/cmdline-tools/tools/bin/sdkmanager: No such file or directory
```
To prevent this problem from happening, and you don't wanna bother modifying storage driver. The only solution is to mount an external SDK volume from host to container. Then you are free to try any of below approaches.
* Update SDK in the usual way but directly inside container.
* Update SDK from host directory (**Remember**: the host machine must be the same target architecture as the container - `x86_64 Linux`).
If you by accident update SDK on a host machine which has a mismatch target architecture than the container, some binaries won't be executable in container any longer.
```bash
gradle <some_task>
#=> Error: java.util.concurrent.ExecutionException: java.lang.RuntimeException: AAPT process not ready to receive commands
$ANDROID_HOME/build-tools/x.x.x/aapt
#=> aapt: cannot execute binary file: Exec format error
adb
#=> adb: cannot execute binary file: Exec format error
```
Note:
* > [Docker Desktop for Mac and Docker Desktop for Windows are intended for development, rather than production. Modifying the storage driver on these platforms is not possible.](https://docs.docker.com/storage/storagedriver/select-storage-driver/#docker-desktop-for-mac-and-docker-desktop-for-windows)
* AUFS storage driver was deprecated in *Docker Community Edition 18.06.0-ce-mac70 2018-07-25*. And AUFS support was removed in *Docker Community Edition 2.0.0.0-mac78 2018-11-19*. For more details, please check [Docker for Mac Stable release notes](https://docs.docker.com/docker-for-mac/release-notes/).
More information about **storage driver**:
* Check Docker's current storage driver option
```console
docker info | grep 'Storage Driver'
```
* Check which filesystems are supported by the running host kernel
```console
cat /proc/filesystems
```
* Some storage drivers only work with specific backing filesystems. Check [supported backing filesystems](https://docs.docker.com/storage/storagedriver/select-storage-driver/#supported-backing-filesystems) for further details.
* In order to change the storage driver, you need to edit the [**daemon configuration file**](https://docs.docker.com/engine/reference/commandline/dockerd/#daemon-configuration-file), or go to **Docker Desktop** -> **Preferences...** -> **Daemon** -> **Advanced**.
```console
{
"storage-driver": ""
}
```
## Getting Started
```bash
# build the image
# set the working directory to the project's root directory first
docker build -t android-sdk android-sdk
# or you can also pass specific tool version as you wish (optional, while there is default version)
docker build --build-arg JDK_VERSION=<jdk_version> --build-arg GRADLE_VERSION=<gradle_version> --build-arg KOTLIN_VERSION=<kotlin_version> --build-arg ANDROID_SDK_VERSION=<android_sdk_version> -t android-sdk android-sdk
# or pull the image instead of building on your own
docker pull thyrlian/android-sdk
# below commands assume that you've pulled the image
# copy the pre-downloaded SDK to the mounted 'sdk' directory
docker run -it --rm -v $(pwd)/sdk:/sdk thyrlian/android-sdk bash -c 'cp -a $ANDROID_HOME/. /sdk'
# go to the 'sdk' directory on the host, update the SDK
# ONLY IF the host machine is the same target architecture as the container
# JDK required on the host
sdk/cmdline-tools/tools/bin/sdkmanager --update
# or install specific packages
sdk/cmdline-tools/tools/bin/sdkmanager "build-tools;x.y.z" "platforms;android-<api_level>" ...
# mount the updated SDK to container again
# if the host SDK directory is mounted to more than one container
# to avoid multiple containers writing to the SDK directory at the same time
# you should mount the SDK volume in read-only mode
docker run -it -v $(pwd)/sdk:/opt/android-sdk:ro thyrlian/android-sdk /bin/bash
# you can mount without read-only option, only if you need to update SDK inside container
docker run -it -v $(pwd)/sdk:/opt/android-sdk thyrlian/android-sdk /bin/bash
# to keep and reuse Gradle cache
docker run -it -v $(pwd)/sdk:/opt/android-sdk -v $(pwd)/gradle-caches:/root/.gradle/caches thyrlian/android-sdk /bin/bash
# to stop and remove container
# when the image was pulled from a registry
docker stop $(docker ps -aqf "ancestor=thyrlian/android-sdk") &> /dev/null && docker rm $(docker ps -aqf "ancestor=thyrlian/android-sdk") &> /dev/null
# when the image was built locally
docker stop $(docker ps -aqf "ancestor=android-sdk") &> /dev/null && docker rm $(docker ps -aqf "ancestor=android-sdk") &> /dev/null
# more flexible way - doesn't matter where the image comes from
docker stop $(docker ps -a | grep 'android-sdk' | awk '{ print $1 }') &> /dev/null && docker rm $(docker ps -a | grep 'android-sdk' | awk '{ print $1 }') &> /dev/null
```
### Accepting Licenses
A helper script is provided at [`/opt/license-accepter.sh`](https://github.com/thyrlian/AndroidSDK/blob/master/android-sdk/license-accepter.sh) for accepting the SDK and its various licenses. This is helpful in non-interactive environments such as CI builds.
## SSH
It is also possible if you wanna connect to container via SSH. There are three different approaches.
* Build an image on your own, with a built-in `authorized_keys`
```bash
# Put your `id_rsa.pub` under `android-sdk/accredited-keys` directory (as many as you want)
# Build an image, then an `authorized_keys` file will be composed automatically, based on the keys from `android-sdk/accredited-keys` directory
docker build -t android-sdk android-sdk
# Run a container
docker run -d -p 2222:22 -v $(pwd)/sdk:/opt/android-sdk:ro android-sdk
```
* Mount `authorized_keys` file from the host to a container
```bash
# Make sure your local authorized_keys file has the correct permission set
chmod 600 $(pwd)/authorized_keys
sudo chown root:root authorized_keys
docker run -d -p 2222:22 -v $(pwd)/authorized_keys:/root/.ssh/authorized_keys thyrlian/android-sdk
```
* Copy a local `authorized_keys` file to a container
```bash
# Create a local `authorized_keys` file, which contains the content from your `id_rsa.pub`
# Make sure your local authorized_keys file has the correct permission set
chmod 600 $(pwd)/authorized_keys
# Run a container
docker run -d -p 2222:22 -v $(pwd)/sdk:/opt/android-sdk:ro thyrlian/android-sdk
# Copy the just created local authorized_keys file to the running container
docker cp $(pwd)/authorized_keys `docker ps -aqf "ancestor=thyrlian/android-sdk"`:/root/.ssh/authorized_keys
# Set the proper owner and group for authorized_keys file
docker exec -it `docker ps -aqf "ancestor=thyrlian/android-sdk"` bash -c 'chown root:root /root/.ssh/authorized_keys'
```
That's it! Now it's up and running, you can ssh to it
```console
ssh root@<container_ip_address> -p 2222
```
And, in case you need, you can still attach to the running container (not via ssh) by
```console
docker exec -it <container_id> /bin/bash
```
<img src="https://github.com/thyrlian/AndroidSDK/blob/master/assets/SSH.png?raw=true">
## VNC
Remote access to the container's desktop might be helpful if you plan to run emulator inside the container.
```bash
# pull the image with VNC support
docker pull thyrlian/android-sdk-vnc
# spin up a container with SSH
# won't work when spin up with interactive session, since the vncserver won't get launched
docker run -d -p 5901:5901 -p 2222:22 -v $(pwd)/sdk:/opt/android-sdk thyrlian/android-sdk-vnc
```
When the container is up and running, use your favorite VNC client to connect to it:
* `<container_ip_address>:5901`
* Password (with control): ***android***
* Password (view only): ***docker***
```bash
# setup and launch emulator inside the container
# create a new Android Virtual Device
echo "no" | avdmanager create avd -n test -k "system-images;android-25;google_apis;armeabi-v7a"
# launch emulator
emulator -avd test -no-audio -no-boot-anim -accel on -gpu swiftshader_indirect &
```
For more details, please refer to [Emulator section](https://github.com/thyrlian/AndroidSDK#emulator).
<img src="https://github.com/thyrlian/AndroidSDK/blob/master/assets/vnc.png?raw=true">
### VNC client recommendation
* macOS: [Screen Sharing](https://support.apple.com/guide/mac-help/share-the-screen-of-another-mac-mh14066/mac)
* Linux: [Remmina](https://remmina.org/)
* Cross-Platform: [VNC Viewer](https://www.realvnc.com/en/connect/download/viewer/)
## NFS
You can host the Android SDK in one host-independent place, and share it across different containers. One solution is using NFS (Network File System).
To make the container consume the NFS, you can try either way below:
* Mount the NFS onto your host machine, then run container with volume option (`-v`).
* Use a Docker volume plugin, for instance [Convoy plugin](https://github.com/rancher/convoy).
And here are instructions for configuring a NFS server (on Ubuntu):
```bash
sudo apt-get update
sudo apt-get install -y nfs-kernel-server
sudo mkdir -p /var/nfs/android-sdk
# put the Android SDK under /var/nfs/android-sdk
# if you haven't got any, run below commands
sudo apt-get install -y wget zip
cd /var/nfs/android-sdk
sudo wget -q $(wget -q -O- 'https://developer.android.com/sdk' | grep -o "\"https://.*android.*tools.*linux.*\"" | sed "s/\"//g")
sudo unzip *tools*linux*.zip
sudo rm *tools*linux*.zip
sudo mkdir licenses
echo 8933bad161af4178b1185d1a37fbf41ea5269c55 | sudo tee licenses/android-sdk-license > /dev/null
echo 84831b9409646a918e30573bab4c9c91346d8abd | sudo tee licenses/android-sdk-preview-license > /dev/null
echo d975f751698a77b662f1254ddbeed3901e976f5a | sudo tee licenses/intel-android-extra-license > /dev/null
# configure and launch NFS service
sudo chown nobody:nogroup /var/nfs
echo "/var/nfs *(rw,sync,no_subtree_check,no_root_squash)" | sudo tee --append /etc/exports > /dev/null
sudo exportfs -a
sudo service nfs-kernel-server start
```
## Gradle Distributions Mirror Server
There is still room for optimization: recent distribution of Gradle is around 100MB, imagine different containers / build jobs have to perform downloading over and over again, and it has high influence upon your network bandwidth. Setting up a local Gradle distributions mirror server would significantly boost your download speed.
Fortunately, you can easily build such a mirror server docker image on your own.
```bash
docker build -t gradle-server gradle-server
# by default it downloads the most recent 14 gradle distributions (excluding rc or milestone)
# or you can also pass how many gradle distributions should be downloaded
docker build --build-arg GRADLE_DOWNLOAD_AMOUNT=<amount_of_gradle_distributions_to_be_downloaded> -t gradle-server gradle-server
```
Preferably, you should run the [download script](https://github.com/thyrlian/AndroidSDK/blob/master/gradle-server/gradle-downloader.sh) locally, and mount the download directory to the container.
```bash
gradle-server/gradle-downloader.sh [DOWNLOAD_DIRECTORY] [DOWNLOAD_AMOUNT]
docker run -d -p 80:80 -p 443:443 -v [DOWNLOAD_DIRECTORY]:/var/www/gradle.org/public_html/distributions gradle-server
```
```bash
# copy the SSL certificate from gradle server container to host machine
docker cp `docker ps -aqf "ancestor=gradle-server"`:/etc/apache2/ssl/apache.crt apache.crt
# copy the SSL certificate from host machine to AndroidSDK container
docker cp apache.crt `docker ps -aqf "ancestor=thyrlian/android-sdk"`:/home/apache.crt
# add self-signed SSL certificate to Java keystore
docker exec -it `docker ps -aqf "ancestor=thyrlian/android-sdk"` bash -c '$JAVA_HOME/bin/keytool -import -trustcacerts -file /home/apache.crt -keystore $JAVA_HOME/jre/lib/security/cacerts -storepass changeit -noprompt'
# map gradle services domain to your local IP
docker exec -it `docker ps -aqf "ancestor=thyrlian/android-sdk"` bash -c 'echo "[YOUR_HOST_IP_ADDRESS_FOR_GRADLE_CONTAINER] services.gradle.org" >> /etc/hosts'
```
Starting from now on, gradle wrapper will download gradle distributions from your local mirror server, lightning fast! The downloaded distribution will be uncompressed to `/root/.gradle/wrapper/dists`.
If you don't want to bother with SSL certificate, you can simply change the `distributionUrl` inside `[YOUR_PROJECT]/gradle/wrapper/gradle-wrapper.properties` from `https` to `http`.
## Emulator
ARM emulator is host machine independent, can run anywhere - Linux, macOS, VM and etc. While the performance is a bit poor. On the contrary, x86 emulator requires KVM, which means only runnable on Linux.
According to [Google's documentation](https://developer.android.com/studio/run/emulator-acceleration.html#accel-vm):
> **VM acceleration restrictions**
>
> Note the following restrictions of VM acceleration:
>
> * You can't run a VM-accelerated emulator inside another VM, such as a VM hosted by VirtualBox, VMWare, or Docker. You must run the emulator directly on your system hardware.
>
> * You can't run software that uses another virtualization technology at the same time that you run the accelerated emulator. For example, VirtualBox, VMWare, and Docker currently use a different virtualization technology, so you can't run them at the same time as the accelerated emulator.
### Preconditions on the host machine (for x86 emulator)
Read [How to Start Intel Hardware-assisted Virtualization (hypervisor) on Linux](https://software.intel.com/en-us/blogs/2012/03/12/how-to-start-intel-hardware-assisted-virtualization-hypervisor-on-linux-to-speed-up-intel-android-x86-emulator) for more details.
Read [KVM Installation](https://help.ubuntu.com/community/KVM/Installation) if you haven't got KVM installed on the host yet.
* Check the capability of running KVM
```bash
grep -cw ".*\(vmx\|svm\).*" /proc/cpuinfo
# or
egrep -c '(vmx|svm)' /proc/cpuinfo
# a non-zero result means the host CPU supports hardware virtualization.
sudo kvm-ok
# seeing below info means you can run your virtual machine faster with the KVM extensions
INFO: /dev/kvm exists
KVM acceleration can be used
```
* Load KVM module on the host
```console
sudo modprobe kvm
# or for Intel processors
sudo modprobe kvm-intel
# or for AMD processors
sudo modprobe kvm-amd
```
* Check if KVM module is successfully loaded
```console
lsmod | grep kvm
```
### Where can I run x86 emulator
* Linux physical machine
* Cloud computing services (must support nested virtualization)
**Note**: there will be a performance penalty, primarily for CPU bound workloads and I/O bound workloads.
* [Amazon Web Services](https://aws.amazon.com/blogs/compute/running-hyper-v-on-amazon-ec2-bare-metal-instances/)
* [Google Cloud Platform](https://cloud.google.com/compute/docs/instances/enable-nested-virtualization-vm-instances)
* [IBM Cloud](https://www.ibm.com/developerworks/cloud/library/cl-nestedvirtualization/index.html)
* [Microsoft Azure](https://azure.microsoft.com/en-us/blog/nested-virtualization-in-azure/)
* [VirtualBox](https://www.virtualbox.org/) (since 6.0.0, it started supporting nested virtualization, which could be turned on by "Enable Nested VT-x/AMD-V", but at the moment, it's only for AMD CPUs)
### How to run emulator
* Check available emulator system images from remote SDK repository
```console
sdkmanager --list --verbose
```
* Make sure that the required SDK packages are installed, you can find out by above command. To install, use the command below. Whenever you see error complains about `ANDROID_SDK_ROOT` (or `ANDROID_HOME`), such as `PANIC: Cannot find AVD system path. Please define ANDROID_SDK_ROOT` or `PANIC: Broken AVD system path. Check your ANDROID_SDK_ROOT value`, it means that you need to install following packages.
```console
sdkmanager "platform-tools" "platforms;android-<api_level>" "emulator"
```
* Download emulator system image(s) (on the host machine)
```bash
sdkmanager "system_image_1" "system_image_2"
# e.g.:
# system-images;android-24;android-tv;x86
# system-images;android-24;default;arm64-v8a
# system-images;android-24;default;armeabi-v7a
# system-images;android-24;default;x86
# system-images;android-24;default;x86_64
# system-images;android-24;google_apis;arm64-v8a
# system-images;android-24;google_apis;armeabi-v7a
# system-images;android-24;google_apis;x86
# system-images;android-24;google_apis;x86_64
# system-images;android-24;google_apis_playstore;x86
```
* Run Docker container in privileged mode (not necessary for ARM emulator)
```bash
# required by KVM
docker run -it --privileged -v $(pwd)/sdk:/opt/android-sdk:ro thyrlian/android-sdk /bin/bash
```
* Check acceleration ability (not necessary for ARM emulator)
```bash
emulator -accel-check
# when succeeds
accel:
0
KVM (version 12) is installed and usable.
accel
# when fails (probably due to unprivileged mode)
accel:
8
/dev/kvm is not found: VT disabled in BIOS or KVM kernel module not loaded
accel
```
* Create a new Android Virtual Device
```bash
echo "no" | avdmanager create avd -n <name> -k <sdk_id>
# e.g.:
echo "no" | avdmanager create avd -n test -k "system-images;android-24;default;armeabi-v7a"
```
* List existing Android Virtual Devices
```bash
avdmanager list avd
# ==================================================
Available Android Virtual Devices:
Name: test
Path: /root/.android/avd/test.avd
Target: Default Android System Image
Based on: Android 7.0 (Nougat) Tag/ABI: default/armeabi-v7a
# ==================================================
# or
emulator -list-avds
# 32-bit Linux Android emulator binaries are DEPRECATED
# ==================================================
test
# ==================================================
```
* Launch emulator in background
```bash
emulator -avd <virtual_device_name> -no-audio -no-boot-anim -no-window -accel on -gpu off &
# if the container is not running in privileged mode, you should see below errors:
#=> emulator: ERROR: x86_64 emulation currently requires hardware acceleration!
#=> Please ensure KVM is properly installed and usable.
#=> CPU acceleration status: /dev/kvm is not found: VT disabled in BIOS or KVM kernel module not loaded
# or it's running on top of a VM
#=> CPU acceleration status: KVM requires a CPU that supports vmx or svm
```
* Check the virtual device status
```bash
adb devices
# ==================================================
List of devices attached
emulator-5554 offline
# "offline" means it's still booting up
# ==================================================
# ==================================================
List of devices attached
emulator-5554 device
# "device" means it's ready to be used
# ==================================================
```
Now you can for instance run UI tests on the emulator (just remember, the performance is POOR):
```console
<your_android_project>/gradlew connectedAndroidTest
```
### Troubleshooting emulator
If you encounter an error "***Process system isn't responding***" in the emulator, like below:
<img src="https://github.com/thyrlian/AndroidSDK/blob/master/assets/emulator-error-process-not-responding.png?raw=true">
You could try:
* Increase the limit of the memory resource available to Docker Engine.
* Increase the amount of physical RAM on the emulator by setting / changing `hw.ramSize` in the AVD's configuration file (`config.ini`). By default, it's not set and the default value is "96" (in megabytes). You could simply set a new value via this command: `echo "hw.ramSize=1024" >> /root/.android/avd/<your_avd_name>.avd/config.ini`
### Access the emulator from outside
Default adb server port: `5037`
```bash
# spin up a container
# with SSH
docker run -d -p 5037:5037 -p 2222:22 -v $(pwd)/sdk:/opt/android-sdk thyrlian/android-sdk-vnc
# or with interactive session
docker run -it -p 5037:5037 -v $(pwd)/sdk:/opt/android-sdk thyrlian/android-sdk-vnc /bin/bash
# launch emulator inside the container...
```
Outside the container:
```bash
adb connect <container_ip_address>:5037
adb devices
#=> List of devices attached
#=> emulator-5554 device
```
Make sure that your **adb client** talks to the **adb server** inside the container, instead of the local one on the host machine. This can be achieved by running `adb kill-server` (to kill the local server if it's already up) before firing `adb connect` command above.
## Android Device
You can give a container access to host's USB Android devices.
```console
# on Linux
docker run -it --privileged -v /dev/bus/usb:/dev/bus/usb -v $(pwd)/sdk:/opt/android-sdk thyrlian/android-sdk /bin/bash
# or
# try to avoid privileged flag, just add necessary capabilities when possible
# --device option allows you to run devices inside the container without the --privileged flag
docker run -it --device=/dev/ttyUSB0 -v $(pwd)/sdk:/opt/android-sdk thyrlian/android-sdk /bin/bash
```
Note:
* Connect Android device via USB on host first;
* Launch container;
* Disconnect and connect Android device on USB;
* Select OK for "Allow USB debugging" on Android device;
* Now the Android device will show up inside the container (`adb devices`).
Don't worry about `adbkey` or `adbkey.pub` under `/.android`, not required.
[Docker for Mac FAQ](https://docs.docker.com/docker-for-mac/faqs/#can-i-pass-through-a-usb-device-to-a-container) says:
> Unfortunately it is not possible to pass through a USB device (or a serial port) to a container.
## Firebase Test Lab
You can also run UI tests on Google's [Firebase Test Lab](https://firebase.google.com/docs/test-lab) with emulators or physical devices.
To create and configure a project on the platform:
* Create a project in [Google Cloud Platform](https://console.cloud.google.com/cloud-resource-manager) if you haven't created one yet.
* Create a project in [Firebase](https://console.firebase.google.com/):
* Choose the recently created Google Cloud Platform project to add Firebase services to it.
* Confirm Firebase billing plan.
* Go to **IAM & Admin** -> **Service Accounts** in [Google Cloud Platform](https://console.cloud.google.com/iam-admin/serviceaccounts):
* Edit the Firebase Admin SDK Service Agent account.
* **Keys** -> **ADD KEY** -> **Create new key** -> **Key type**: **JSON** -> **CREATE**.
* Download and save the created private key to your computer.
* Go to **IAM & Admin** -> **IAM** in [Google Cloud Platform](https://console.cloud.google.com/iam-admin/iam):
* Edit the Firebase Admin SDK Service Agent account.
* **ADD ANOTHER ROLE** -> **Role**: **Project** -> **Editor** -> **SAVE**.
* Go to [API Library](https://console.developers.google.com/apis/library) -> search for **Cloud Testing API** and **Cloud Tool Results API** -> enable them.
Once finished setup, you can then launch a container to deploy UI tests to Firebase Test Lab:
```bash
# pull the image with Google Cloud SDK integrated
docker pull thyrlian/android-sdk-firebase-test-lab
# spin up a container
# don't forget to mount the previously created private key, assume it's saved as firebase.json
# we'll persist all your gcloud configuration which would be created at ~/.config/gcloud/
# spin up a container with interactive mode
docker run -it -v $(pwd)/sdk:/opt/android-sdk -v <your_private_key_dir>/firebase.json:/root/firebase.json -v $(pwd)/gcloud-config:/root/.config/gcloud thyrlian/android-sdk-firebase-test-lab /bin/bash
# or spin up a container with SSH
docker run -d -p 2222:22 -v $(pwd)/sdk:/opt/android-sdk -v <your_private_key_dir>/firebase.json:/root/firebase.json -v $(pwd)/gcloud-config:/root/.config/gcloud -v $(pwd)/authorized_keys:/root/.ssh/authorized_keys thyrlian/android-sdk-firebase-test-lab
# authorize access to Google Cloud Platform with a service account (by its private key)
gcloud auth activate-service-account -q --key-file /root/firebase.json
# list all Android models available for testing
gcloud firebase test android models list
# below are just some examples, to give you an idea how it looks like
┌───────────────────┬────────────────────┬──────────────────────────────────────┬──────────┬─────────────┬─────────────────────────┬───────────────┐
│ MODEL_ID │ MAKE │ MODEL_NAME │ FORM │ RESOLUTION │ OS_VERSION_IDS │ TAGS │
├───────────────────┼────────────────────┼──────────────────────────────────────┼──────────┼─────────────┼─────────────────────────┼───────────────┤
│ Nexus9 │ HTC │ Nexus 9 │ VIRTUAL │ 2048 x 1536 │ 21,22,23,24,25 │ │
│ NexusLowRes │ Generic │ Low-resolution MDPI phone │ VIRTUAL │ 640 x 360 │ 23,24,25,26,27,28,29,30 │ beta=30 │
│ OnePlus3T │ OnePlus │ OnePlus 3T │ PHYSICAL │ 1920 x 1080 │ 26 │ │
└───────────────────┴────────────────────┴──────────────────────────────────────┴──────────┴─────────────┴─────────────────────────┴───────────────┘
# build both the app and the instrumented tests APKs
# build the application APK
./gradlew :<your_module>:assemble
# APK will be generated at: <your_module>/build/outputs/apk/<build_type>
# build the instrumented tests APK
./gradlew :<your_module>:assembleAndroidTest
# APK will be generated at: <your_module>/build/outputs/apk/androidTest/<build_type>
# run UI tests
UI_TEST_APK="--app=<your_apk_path>/debug.apk --test=<your_apk_path>/androidTest.apk"
UI_TEST_TYPE="instrumentation"
UI_TEST_DEVICES="--device model=MODEL_ID,version=OS_VERSION_IDS,locale=en,orientation=portrait"
UI_TEST_RESULT_DIR="build-result"
UI_TEST_PROJECT="<your_project_id>"
gcloud firebase test android run $UI_TEST_APK $UI_TEST_DEVICES --type=$UI_TEST_TYPE --results-dir=$UI_TEST_RESULTS_DIR --project=$UI_TEST_PROJECT
# it's capable of running in parallel on separate devices with a number of shards
# if you want to evenly distribute test cases into a number of shards, specify the flag: --num-uniform-shards=int
# e.g.: to run 20 tests in parallel on 4 devices (5 tests per device): --num-uniform-shards=4
```
Later you can view the test results (including the recorded video of test execution) in [Firebase Console](https://console.firebase.google.com), open your ***project***, navigate to **Test Lab**.
To learn more about Firebase Test Lab and Google Cloud SDK, please go and visit below links:
* [Firebase Test Lab Overview](https://firebase.google.com/docs/test-lab/android/overview)
* [Google Cloud SDK CLI Command Group for Android Application Testing](https://cloud.google.com/sdk/gcloud/reference/beta/firebase/test/android)
## Android Commands Reference
* Check installed Android SDK tools version
```console
cat $ANDROID_HOME/cmdline-tools/tools/source.properties | grep Pkg.Revision
cat $ANDROID_HOME/platform-tools/source.properties | grep Pkg.Revision
```
> The "`android`" command is deprecated. For command-line tools, use `cmdline-tools/tools/bin/sdkmanager` and `cmdline-tools/tools/bin/avdmanager`.
* List installed and available packages
```console
sdkmanager --list
# print full details instead of truncated path
sdkmanager --list --verbose
```
* Update all installed packages to the latest version
```bash
sdkmanager --update
```
* Install packages
> The packages argument is an SDK-style path as shown with the `--list` command, wrapped in quotes (for example, `"extras;android;m2repository"`). You can pass multiple package paths, separated with a space, but they must each be wrapped in their own set of quotes.
```bash
sdkmanager "extras;android;m2repository" "extras;google;m2repository" "extras;google;google_play_services" "extras;google;instantapps" "extras;m2repository;com;android;support;constraint;constraint-layout;1.0.2" "build-tools;26.0.0" "platforms;android-26"
```
* Stop emulator
```console
adb -s <device_sn> emu kill
```
## Demythologizing Memory
### OOM behaviour
Sometimes you may encounter OOM (Out of Memory) issue. The issues vary in logs, while you could find the essence by checking the exit code (`echo $?`).
For demonstration, below examples try to execute [MemoryFiller](https://github.com/thyrlian/AndroidSDK/blob/master/misc/MemoryFiller/MemoryFiller.java) which can fill memory up quickly.
* **Exit Code** `137` (= 128 + 9 = SIGKILL = Killed)
Example code:
```bash
# spin up a container with memory limit (128MB)
docker run -it -m 128m -v $(pwd)/misc/MemoryFiller:/root/MemoryFiller thyrlian/android-sdk /bin/bash
# fill memory up
cd /root/MemoryFiller && javac MemoryFiller.java
java MemoryFiller
```
Logs:
```console
Killed
```
Commentary: The process was in extreme resource starvation, thus was killed by the kernel OOM killer. This happens when **JVM max heap size > actual container memory**. Similarly, the logs could look like this when running a gradle task in an Android project: `Process 'Gradle Test Executor 1' finished with non-zero exit value 137`.
* **Exit Code** `1` (= SIGHUP = Hangup)
Example code:
```bash
# spin up a container with memory limit (or without - both lead to the same result)
docker run -it -m 128m -v $(pwd)/misc/MemoryFiller:/root/MemoryFiller thyrlian/android-sdk /bin/bash
# fill memory up
# enable Docker memory limits transparency for JVM
cd /root/MemoryFiller && javac MemoryFiller.java
java -XX:+UnlockExperimentalVMOptions -XX:+UseCGroupMemoryLimitForHeap MemoryFiller
```
Logs:
```console
Exception in thread "main" java.lang.OutOfMemoryError: Java heap space at MemoryFiller.main(MemoryFiller.java:13)
```
Commentary: With [enabling Docker memory limits transparency for JVM](https://blogs.oracle.com/java-platform-group/java-se-support-for-docker-cpu-and-memory-limits), JVM is able to correctly estimate the max heap size, and it won't be killed by the kernel OOM killer any more. Similarly, the logs could look like this when running a gradle task in an Android project: `Process 'Gradle Test Executor 1' finished with non-zero exit value 1`. In this case, you should either check your code or tweak your memory limit for container (or JVM heap parameters, or even the host memory size).
* **Exit Code** `3` (= SIGQUIT = Quit)
Example code:
```bash
# spin up a container without memory limit
docker run -it -v $(pwd)/misc/MemoryFiller:/root/MemoryFiller thyrlian/android-sdk /bin/bash
# fill memory up
cd /root/MemoryFiller && javac MemoryFiller.java
# make sure that Docker memory resource is big enough > JVM max heap size
# otherwise it's better to run with UnlockExperimentalVMOptions & UseCGroupMemoryLimitForHeap enabled
java -XX:+ExitOnOutOfMemoryError MemoryFiller
```
Logs:
```console
Terminating due to java.lang.OutOfMemoryError: Java heap space
```
Commentary: JRockit JVM exits on the first occurrence of an OOM error. It can be used if you prefer restarting an instance of JRockit JVM rather than handling OOM errors.
* **Exit Code** `134` (= 128 + 6 = SIGABRT = Abort)
Example code:
```bash
# spin up a container without memory limit
docker run -it -v $(pwd)/misc/MemoryFiller:/root/MemoryFiller thyrlian/android-sdk /bin/bash
# fill memory up
cd /root/MemoryFiller && javac MemoryFiller.java
# make sure that Docker memory resource is big enough > JVM max heap size
# otherwise it's better to run with UnlockExperimentalVMOptions & UseCGroupMemoryLimitForHeap enabled
java -XX:+CrashOnOutOfMemoryError MemoryFiller
```
Logs:
```console
Aborting due to java.lang.OutOfMemoryError: Java heap space
#
# A fatal error has been detected by the Java Runtime Environment:
#
# Internal Error (debug.cpp:308), pid=63, tid=0x00007f208708d700
# fatal error: OutOfMemory encountered: Java heap space
#
# JRE version: OpenJDK Runtime Environment (8.0_131-b11) (build 1.8.0_131-8u131-b11-2ubuntu1.16.04.3-b11)
# Java VM: OpenJDK 64-Bit Server VM (25.131-b11 mixed mode linux-amd64 compressed oops)
# Failed to write core dump. Core dumps have been disabled. To enable core dumping, try "ulimit -c unlimited" before starting Java again
#
# An error report file with more information is saved as:
# /root/MemoryFiller/hs_err_pid63.log
#
# If you would like to submit a bug report, please visit:
# http://bugreport.java.com/bugreport/crash.jsp
#
Aborted
```
Commentary: JRockit JVM crashes and produces text and binary crash files when an OOM error occurs. When JVM crashes with a fatal error, an error report file `hs_err_pid***.log` will be generated in the same working directory.
### Facts
* JVM is not container aware, and always guesses about the memory resource (for JDK version earlier than 8u131 or 9).
* Many tools (such as `free`, `vmstat`, `top`) were invented before the existence of [cgroups](https://en.wikipedia.org/wiki/Cgroups), thus they have no clue about the resources limits.
* `-XX:MaxRAMFraction`: maximum fraction (1/n) of real memory used for maximum heap size (`-XX:MaxHeapSize` / `-Xmx`), the default value is 4.
* `-XX:MaxMetaspaceSize`: where class metadata reside. `-XX:MaxPermSize` is deprecated in JDK 8. It used to be Permanent Generation space before JDK 8, which could cause `java.lang.OutOfMemoryError: PermGen` problem.
* `-XshowSettings:category`: shows settings and continues. Possible category arguments for this option include the following: `all` (all categories of settings, the default value), `locale` (settings related to locale), `properties` (settings related to system properties), `vm` (settings of the JVM). To get JVM Max Heap Size, simply run `java -XshowSettings:vm -version`
* `-XX:+PrintFlagsFinal`: print all VM flags after argument and ergonomic processing. You can run `java -XX:+PrintFlagsFinal -version` to get all information.
* By default, [Android Gradle Plugin](https://google.github.io/android-gradle-dsl/current/com.android.build.gradle.internal.dsl.DexOptions.html) sets the maxProcessCount to 4 (the maximum number of concurrent processes that can be used to dex). `Total Memory = maxProcessCount * javaMaxHeapSize`
* Earlier in JDK 8, you need to set the environment variable `_JAVA_OPTIONS` to `-XX:+UnlockExperimentalVMOptions -XX:+UseCGroupMemoryLimitForHeap`. Then you'll see such logs like `Picked up _JAVA_OPTIONS: -XX:+UnlockExperimentalVMOptions -XX:+UseCGroupMemoryLimitForHeap` during any task execution, which means it takes effect. JDK 10 has introduced `-XX:+UseContainerSupport` which is enabled by default to improve the execution and configurability of Java running in Docker containers. Since JDK 1.8.0_191, `-XX:+UseContainerSupport` was also backported, then you don't need to set `-XX:+UnlockExperimentalVMOptions -XX:+UseCGroupMemoryLimitForHeap` any more. `UseCGroupMemoryLimitForHeap` was deprecated in JDK 10 and removed in JDK 11.
* `JAVA_OPTS` environment variable won't be used by JVM directly, but sometimes get recognized by other apps (e.g. Apache Tomcat) as configuration. If you want to use it for any Java executable, do it like this: `java $JAVA_OPTS ...`
* The official `JAVA_TOOL_OPTIONS` environment variable is provided to augment a command line, so that command line options can be passed without accessing or modifying the launch command. It is recognized by all VMs.
* You can tweak `-Xms` or `-Xmx` on your own to specify the initial or maximum heap size.
## Docker Config
### How to enable the remote API (for CI purpose)
```bash
# on macOS
brew install socat
socat TCP-LISTEN:2376,reuseaddr,fork UNIX-CONNECT:/var/run/docker.sock
#====================================================================================================#
# on Linux (Debian / Ubuntu)
# changing DOCKER_OPTS is optional
# Use DOCKER_OPTS to modify the daemon startup options
# echo -e '\nDOCKER_OPTS="-H tcp://0.0.0.0:2376 -H unix:///var/run/docker.sock"\n' | sudo tee --append /etc/default/docker > /dev/null
# find the location of systemd unit file
systemctl status docker
#=> docker.service - Docker Application Container Engine
#=> Loaded: loaded (/lib/systemd/system/docker.service; enabled; vendor preset: enabled)
sudo sed -i.bak 's?ExecStart.*?ExecStart=/usr/bin/dockerd -H tcp://0.0.0.0:2376 -H unix:///var/run/docker.sock?g' /lib/systemd/system/docker.service
sudo systemctl daemon-reload
sudo systemctl restart docker.service
# check if the port is listened or not
sudo netstat -tulpn | grep LISTEN
```
## Release guide
* Go to the top-level directory of this project
* Execute [`image-publisher.sh`](https://github.com/thyrlian/AndroidSDK/blob/master/image-publisher.sh) script
```console
./image-publisher.sh [TAG]
```
* Execute [`version-inspector.sh`](https://github.com/thyrlian/AndroidSDK/blob/master/android-sdk/version-inspector.sh) script inside a docker container from local machine to check versions of tools
```console
cmd=$(cat ./android-sdk/version-inspector.sh) && docker run -it --rm android-sdk bash -c "$cmd"
```
* Update [Changelog](https://github.com/thyrlian/AndroidSDK/blob/master/CHANGELOG.md) based on the versions info printed by the above commands
* Create a new tag (name it the version number, just like: `x.x`) with the corresponding commit in Git and publish the tag
## Contributing
Your contribution is always welcome, which will for sure make the Android SDK Docker solution better. Please check the [contributing guide](./CONTRIBUTING.md) to get started! Thank you ☺
## Changelog
See [here](https://github.com/thyrlian/AndroidSDK/blob/master/CHANGELOG.md).
## Stargazers over time
[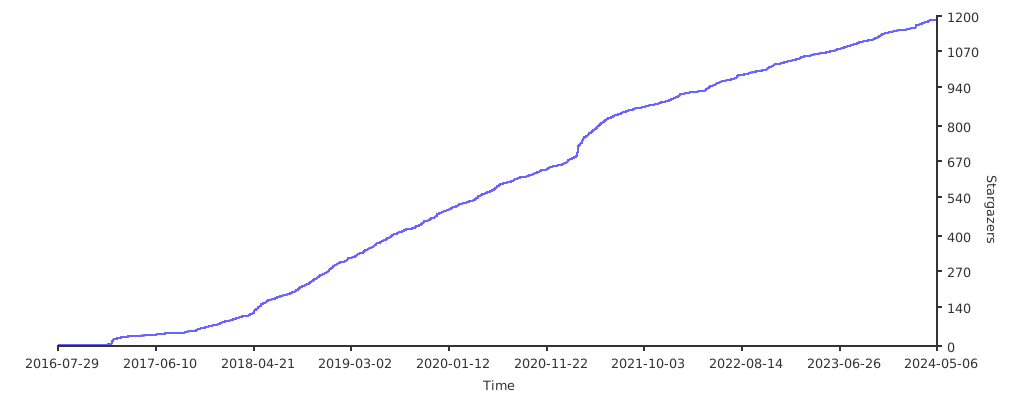](https://starchart.cc/thyrlian/AndroidSDK)
## License
Copyright © 2016-2024 Jing Li. It is released under the [Apache License](https://www.apache.org/licenses/LICENSE-2.0). See the [LICENSE](https://raw.githubusercontent.com/thyrlian/AndroidSDK/master/LICENSE) file for details.
By continuing to use this Docker Image, you accept the terms in below license agreement.
* [Android Software Development Kit License Agreement](https://raw.githubusercontent.com/thyrlian/AndroidSDK/master/EULA/AndroidSoftwareDevelopmentKitLicenseAgreement-20210727) (or read it [here](https://developer.android.com/studio/terms))
* [Android SDK Preview License Agreement](https://raw.githubusercontent.com/thyrlian/AndroidSDK/master/EULA/AndroidSDKPreviewLicenseAgreement)
* [Intel Android Extra License](https://raw.githubusercontent.com/thyrlian/AndroidSDK/master/EULA/IntelAndroidExtraLicense)